Wm Malcolm-style Scope Adjustments & Repairs (Emphasis on J. W. Fecker scopes)
Note – Although the emphasis is on J. W. Fecker scopes, much of the following information will also apply to other brands of externally adjustable “tube type” period-style scopes patterned from the classical Wm Malcolm design.
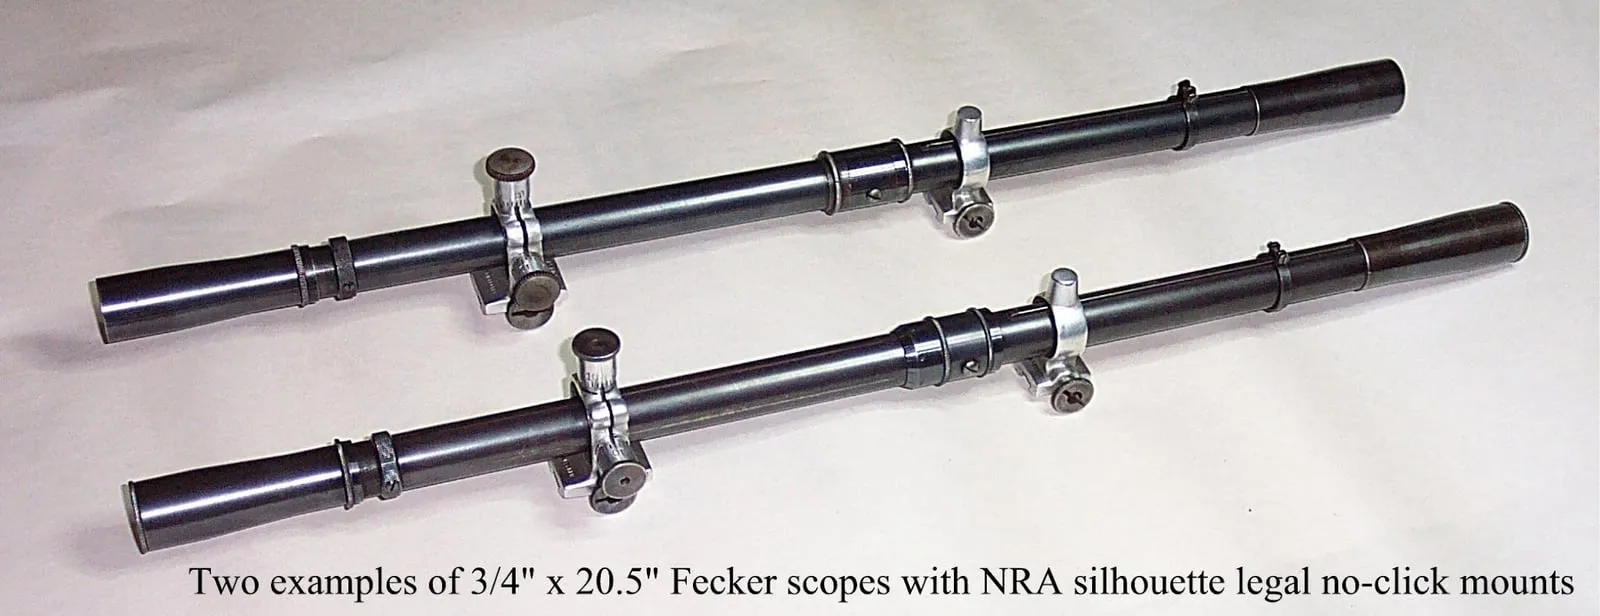
Prior to discussing specific adjustments and minor repairs, I should point out the one very unique feature of a Fecker scope, which is not found on similar models from other suppliers, past or present. For distance focusing and parallax adjustment, rather than using an adjustable objective lens, which can be hard to reach, Fecker scopes feature a mid-tube sliding erector lens. The lens is held captive in a housing that is finely adjustable with two locking rings. The feature is easily identified by a “bulge” in the middle of the scope, resulting in a profile humorously described as being similar to a chicken snake that has recently swallowed an egg. The photo below displays two examples of ¾” Fecker scopes with sliding Pope-style ribs.
Reticle & Image Focus Adjustment
First, allow me to clarify a bit of terminology. I tend to use the terms reticle and crosshair synonymously, but a crosshair is only one form of a reticle. There are post reticles, dot reticles, circular reticles, and many other forms of reticles. In the type of scopes this article discusses, crosshair reticles are by far the most common. Although modern versions of externally adjustable scopes may offer other forms of reticles, I’ve never run across an older scope with anything other than a crosshair reticle, with the possible exception of a crosshair with one or more reference dots added.
Now, prior to adjusting anything else, it’s a good idea to loosen the eyepiece lock ring and, with the scope aimed at a moderately bright defused light source (the sky is great), adjust the eyepiece to optimize the image of the crosshairs. Lock the eyepiece in place and proceed to focus the scope image.
The next step is to bring the scope image into sharp focus at the intended shooting distance. The center (sliding sleeve) has separate locking rings on both ends. One locking ring is usually marked off with a reference scale. The center sliding sleeve does not rotate, but slides fore and aft. The two screws prevent the sleeve from rotating and connect the sleeve to a sliding housing inside the scope tube.
To adjust the focus, loosen one of the locking rings and tighten the other, moving the center sleeve. If the sleeve does not move easily, the two screws may be binding slightly due to age and dried lubricant. Loosen them slightly. Now look through the scope at a target or image positioned at the range you intend to shoot. Using the locking rings, slowly adjust the center sleeve fore or aft until the image is clear and crisp and the crosshairs do not move as you move you head/eye up and down and left and right. If the cross hairs appear to move with the scope held very steady, additional adjustment is necessary. Continue to adjust while moving your head around until the crosshairs cease to move. Lock the center sleeve in place and record the settings for future reference. If you will be using the scope for several distances, such as in BPCR silhouette competition, adjusting and recording the setting may be required for each distance, but I set the adjustment for a mid-range target such as the turkey silhouettes and do not change the focus for the other distances, which works for me.
Reticle Alignment
Adjusting the reticle alignment is relatively easy, but does require a bit of caution. The reticle vertical/horizontal alignment is accomplished by rotating the flat knurled ring located just in front of the eyepiece housing and lock ring. The ring is locked in place by two opposing screws. The screws pass through small slits in the scope tube and screw into the reticle housing. Loosen both screws approximately ½ turn and rotate the knurled ring sufficiently to align the reticle. Now tighten the screws, but here’s where caution is required. The reticle housing is brass and the small screws can easily strip out the threads in the housing if overly tightened. If the threads are stripped, the eyepiece and reticle housing will have to be removed and new holes drilled and tapped, which is a delicate operation, considering the very thin fragile wires and the thin wall of the reticle. I can’t verify the screw threads used for larger scopes but the ¾” tube 20.5” long scopes will require a 2-56 tap and either a #50 or #51 drill. Since the housing is made of brass I prefer the smaller #51 drill. The new holes must be drilled exactly 90 degrees from the existing holes to align with the reticle wires.
Cleaning the Crosshairs
Crosshairs that have accumulated lint or dust can be very irritating to the viewer and may be cleaned if absolutely necessary. But cleaning must be undertaken with caution. First, completely unscrew the eyepiece, which will fully expose the reticle and crosshairs. I do not pretend to be well versed at cleaning crosshairs and have damaged two while successfully cleaning others. Due to the very delicate wires, don’t even consider cleaning them with a cotton-tipped swab or similar applicator. Directing air from a squeeze bulb or from a canned compressed air duster usually works to remove some clinging particles, but additional persuasion will most likely be required. Assuming the reticle is made of very fine wire, a delicate retractable dust brush especially made for cleaning optics may work to gently sweep away clinging debris. Edmund Optics (http://www.edmundoptics.com/) is one source for a relatively inexpensive optics brush. Or better yet, get the Leupold Lens Cleaning Pen, which has a fully-enclosed natural fiber brush on one end and a microfiber cleaning pad on the other end, with a reservoir for lens cleaning fluid. There are no guarantees that you will not damage the crosshairs so don’t attempt to use anything on the crosshairs other than blown air unless you are prepared to have them replaced.
Crosshair Replacement
If the crosshairs are broken or a different type or size is desired, they can be replaced. Refer to my article titled, Replacing Crosshairs in Vintage External Adjustable Scopes.
Lens Separation (Delamination)
Since J. W. Fecker scopes were produced from the mid 1920’s to 1950’s, there’s a chance that shooters will run across older scopes showing signs of lens separation, especially if the scope has not been maintained properly or exposed to high temperature and humidity for extended periods. I’ve never removed the center erector lens, but can verify that both the ocular (eyepiece) and objective lenses are compound lenses. In other words, they’re each constructed of more than one (typically two) glass elements glued together (laminated) with an adhesive closely matching the index of refraction of the lens glass. The adhesive can break down, usually starting along the edge of the lens, progressing inward and forming spider-web cracks, voids, and/or a cloudy region between the elements. In older scopes the adhesive is Canadian balsam. Using the proper technique, it’s a relatively simple process to separate and re-glue (re-laminate) the elements. Having an optics background, I have repaired and re-laminate lenses, and expect that companies advertising classical scope repairs would also have the capabilities. Since instructions are available on the Internet, you could attempt the repair, but will need a spanner wrench or similar tool to remove the lens assuming the rims of the housings for the eyepiece and objective lens are not dented and the inside threads are in good shape. A source of Canadian balsam or a modern type of lens adhesive will be required.
Lens Cleaning
Rather than attempt to instruct you in the proper steps to clean scope lenses, I suggest running a Google search for “cleaning optics” or “cleaning rifle scopes”. The process generally applies to any optical device, including spotting scopes, binoculars, etc. Note, typically one of the 1st steps is to remove any dust using compressed air or a soft optics brush, the same type of brush mentioned earlier to clean the reticle.
Scope Repair Services
Run a Google search for “riflescope repairs” or contact one of the following services for scope repairs or crosshair replacement wire.
Iron Sights, Inc., Scope Service Division, 918-445-2001, 918-521-7736
www.ironsightinc.com. Owner is Mike Sexton and the company is usually backlogged on repairs so don’t be surprised if it takes several months to get your scope back.
Optical Services Co., 915-740-4290
http://targetshooteroptics.com/. Owner is Bill Ackerman. Bills daughter Cheryl is also part of the business. Cheryl can be reached at Cheryl@targetshooteroptics.com.
Parsons Scope Service, 513-867-0820
http://www.parsonsscopeservice.com/, parsonsscope@zoomtown.com, Gil Parson, the founder and longtime owner passed away in Sept. 2010. His son is running the company.
Bob Seip: old.scopes@gmail.com
Craig Stegall, Portland, Oregon, (503) 849-4184
Unertl Optical Company, Inc.
aaron_unertl@earthlink.net. Aaron Davis, a long-term Unertl employee, repairs and reconditions externally adjustable Unertl scopes. He also works on other brands of scopes.
Vintage Scope, Benjamin N. Penk, Santa Maria, CA, (805) 619-7143
For crosshair wire, check for suppliers on eBay or contact Dan Stangarone via email at ds1911@verizon.net. Dan sells tungsten wire in two diameters (0.0015” medium and 0.0005” fine). Send him a self addressed stamped envelope (SASE) for shipping. Dan says it’s annealed tungsten crosshair wire and shows up jet black. If you’re uncertain as to the wire diameter to use, I suggest using 0.0015” since it’s less likely to break and easier to see when handling, but ask Dan for his recommendation.
Wishing you great shooting,
Wayne