Weight Variations in BPCR Cast Bullets (Some Tips for Precision Casting)
The fundamental process of melting lead into round balls to be used as a projectile in the first smooth bore firearms has been around for centuries. More recently bullet casting has been the subject of many articles, papers and books published by experienced shooters and companies manufacturing casting equipment, and numerous articles are available on the Internet. One good Internet source is http://www.longrangebpcr.com/8Phases.htm in which Darryl Hedges covers his 8-phase casting cycle. While reading Darryl’s comments keep in mind that the information is around 10 years old. Since then some new technology has been adapted to control and monitor casting-pot temperature. Also understand that, although I have been casting bullets for several decades, I don’t consider myself an expert on the subject. But in a batch of 60 bullets the typical variance from the average weight has been relatively small, varying +/- 0.5gr on a good day up to +/- 1.0gr on a bad day of casting. With the above understanding I’d like to pass along what works for me.
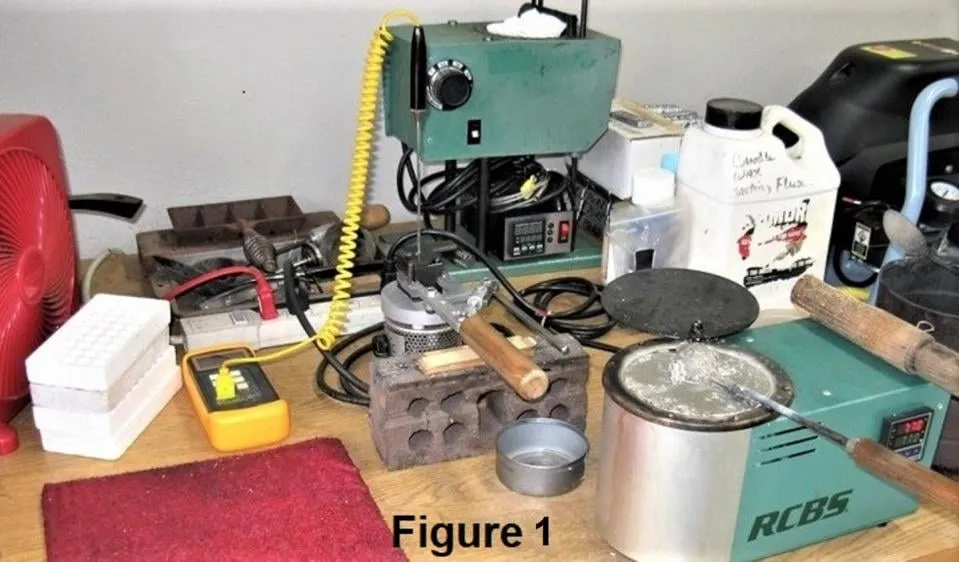
But before proceeding I want to make it clear this article assumes dip or ladle casting relatively heavy black powder cartridge rifle (BPCR) bullets in the range of 350 to 550grs. The mould is filled by transferring the alloy from the pot to the mould with a ladle (aka a dipper). The majority of BPCR casters use a ladle which has proven to produce better quality bullets with less weight dispersion when compared to bullets from a mould filled from the spout of a bottom-pour pot. I started BPCR casting with an RCBS bottom-pour pot that I’d used for many years for handgun bullets, but quickly realized the advantage of ladle casting and used a ladle with the pot until purchasing a modern digitally controlled RCBS Easy Melt “ladle pot”. Both pots are displayed in Figure 1. The older RCBS bottom-pour pot with a separate digital controller is in the background.
So you’ve finished casting a batch of heavy BPCR cast bullets and decided to weigh some or all to determine the results. After careful weighing you find that the weight spread was larger than you expected or prefer. You’re concerned since you’ve likely read that some top shooters have suggested that +/- 0.5grs is necessary or at least the goal for match grade ammo, which may be unrealistic for many casters depending on their technique and equipment. Personally I don’t know what variation in weight is necessary to significantly affect BPCR accuracy but I’ve started an experiment on the subject and hopefully will soon find out. The results will be reported in a future article. Until then I plan to continue weighing and sorting bullets into small weight groups for matches. But let’s get back to the subject at hand.
So what can cause large weight variations in bullets cast in a single session? Assuming a good quality mould that closes properly, there are several factors that can affect bullet weights. I’ll discuss some of the others but the one that’s more important and “stands out” above all the others combined is temperature, temperature of the mould and temperature of the alloy, and mould temperature is the most important of the two, hence my “single session” comment above. By the way, my definition of a single session is one that starts with the first bullet cast and ends without any breaks in between. I.e., a session stops as soon as the process is interrupted or the alloy temperature is affected for any reason: fluxing, spending many, many seconds removing a stubborn sprue or stuck bullet, adding new alloy to the pot, etc.
Weights can vary in visually perfect bullets due to a well understood metallurgical process. As the mould is filled with the hot alloy the metal in direct contact with the mould cools first. Since the center is the last to solidify, a center shrinkage void is created. Temperature of the alloy and the mould affects the size of the shrinkage void. The dispersion in the size of the void is the main reason for the dispersion in bullet weights. If you’ve been casting any time at all you no doubt have noted that as the alloy quickly cools in the mould a small dip or cavity will form in the center of the sprue plate hole. This is the result of the shrinkage void and is the reason one should leave a good size puddle of metal on top of the sprue plate. The puddle supplies additional alloy to help fill the cavity as the alloy cools. Once the puddle cools (freezes) a small shallow dimple will be located in the puddle over the sprue plate hole, another indication of lead being drawn in to fill the shrinkage void.
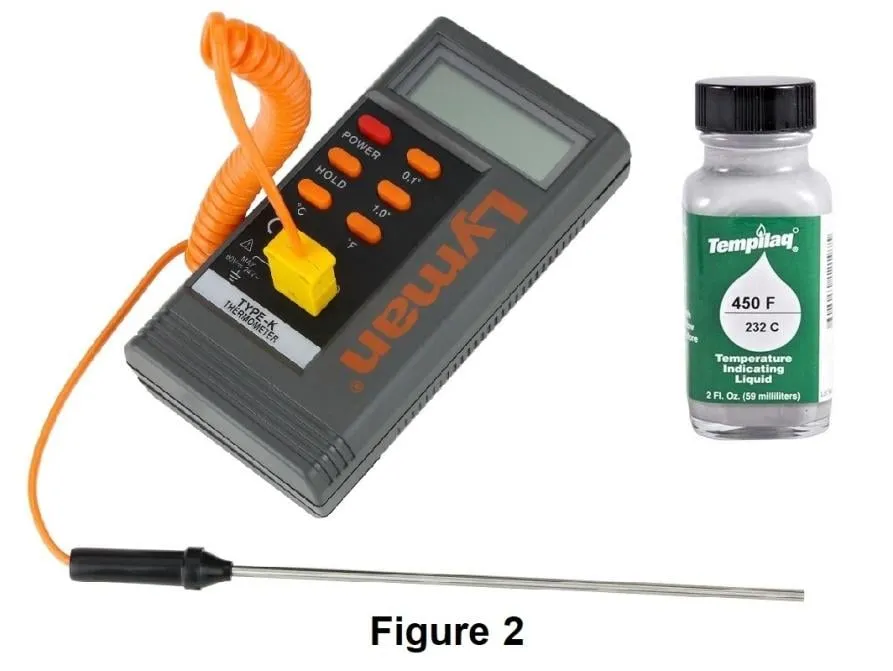
Now let’s consider what happens when starting a casting session with a cold mould. Due to the temperature differential it’s likely the mould will not fill out properly resulting in visually defective bullets. But even if the bullets pass a visual inspection, until the mould comes up to temperature the greater heat disparity will result in larger shrinkage voids. A way to eliminate tossing a bunch of bullets is to preheat the mould. I’ve experimented with and use a small adjustable laboratory hot plate and have determined that preheating a single cavity cast iron mould to around 450 degrees works for me. While preheating, a digital meter is used with a thermocouple probe inserted into the mould cavity for monitoring the temperature. Look closely at Figure 1 and you’ll see the mould setting on the hotplate with the probe inserted in the sprue plate hole. Another method is to apply some Tempilaq, a temperature indicating fluid to the outside of the mould. See Figure 2. Tempilaq can be purchased in several temperature ranges. I suggest 450 degrees F is perfect. It’s available from Brownells, Amazon and other sources. Those of you using an aluminum or brass mould will have to experiment a bit to determine the ideal preheat temperature. By the way, having a hot plate is real handy for keeping the mould hot during necessary session breaks.
Other factors that can affect bullet weights include: casting cadence, ladle-to-mould head pressure, furnace or pot temperature control, temperature stratification of the alloy in the pot, loose sprue plate and lead deposits on the mating surfaces of the mould that prevent it from fully closing. By the way, I cut the sprue over the pot and allow the cutoff portion to drop into the alloy. The temperature effect of dropping the small hot sprue cutoff into the much greater volume of the hotter alloy is insignificant. Others concerned that the cutoffs will significantly affect alloy temperature collect and add them to the pot after finishing a session.
Maintaining a constant cadence helps to minimize variations. Once you’ve figure out the correct timing that allows the sprue to freeze, cut the sprue and drop the bullet, keeping the same time differential between bullets helps maintain the mould at a constant temperature. If you’re using a bottom pour ladle such as the RCBS or Lyman, when mating and rotating the ladle and the mould, the amount of lead in the ladle determines the “head pressure” of the alloy being forced into the mould. More lead in the ladle increases the pressure and minimizes the shrinkage voids. So fill the ladle to the same level each time.
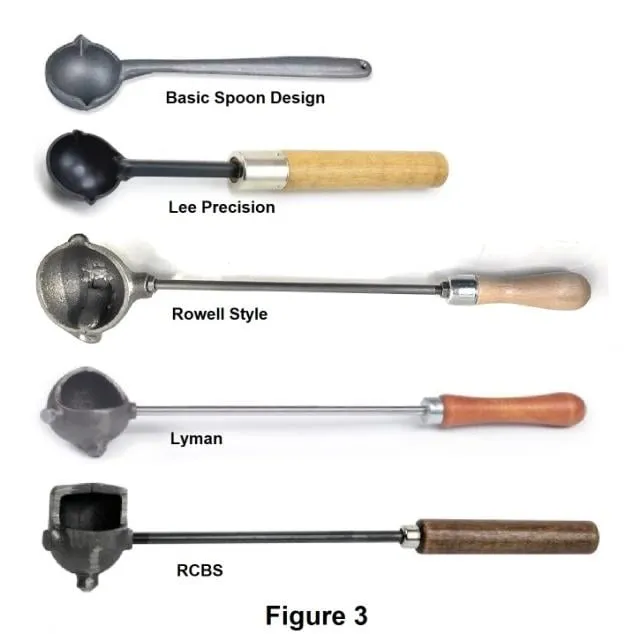
Speaking of ladles, there are many styles but all are either bottom pour or side-pour designs. Figure 3 displays several examples. Some are very effective at separating dross from the alloy being poured into the mould, others are not. The Lee side-pour ladle and similar basic spoon designs do not separate the dross. The Rowell style comes in several dipper sizes. It’s called a bottom pour but is actually a side-pour design that captures the dross-free lead from the bottom of the ladle and feeds it through a tunnel to one side. The spoon and Rowell styles do not create any significant “head pressure”. Having struggled casting acceptable quality bullets with both the Lee and Rowel-style ladles I gave up on both for a bottom pour design. Although I use an RCBS ladle the Lyman ladle is very similar and should work equally as well. When the ladle and mould are turned after mating, the bottom pour ensures the alloy does not contain dross since it floats on top. The unique design that I like about the RCBS ladle is the long flange along the back that’s convenient for moving the dross in the pot out of the way prior to dipping the ladle. The one negative of the RCBS and Lyman design is limited capacity if you’re dip casting for a multiple-cavity mould.
Concerning casting pot temperature control, a couple of experiments have convinced me that varying the pot temperature a few degrees will affect bullet weights. Since my pots have digital controllers the temperature is easy to adjust by small amounts. In two separate experiments the temperature was changed by 5 degrees when casting two styles of .40 caliber (400gr and 415gr) bullets. The average weight change was 0.7grs in one experiment and 1.0gr in the other. Hence one reason I use digital controlled pots and the reasons RCBS and Lyman now sell casting pots with built-in digital controllers. The controller allows changing the temperature in one degree increments and the digital display indicates the alloy temperature. Do you need a digital controlled casting pot? Maybe not, but if you’re considering one see my articles on the subject:
Casting with a PID Controller
Evaluation of the RCBS Easy Melt Casting Furnace with PID
If undisturbed, the alloy temperature can stratify with the hotter alloy rising to the top. Or if the heater is on the alloy in the bottom may be hotter. Temperature stratification is less likely a concern with digital controlled pots than when using a cast iron pot over a propane burner. Regardless, to ensure a constant alloy temperature, I continue to mix the alloy by making it a practice of submerging the ladle to the bottom of the pot each time it’s filled.
An improperly adjusted (usually too loose) sprue plate can affect the final bullet weight in a couple of ways. It can result in an irregular sprue cut and “fining” around the perimeter of the base. And regardless of your casting technique, there are some moulds that eventually collect a bit of lead between the mating surfaces. Hence the mould does not fully close, typically resulting in some whiskers or fining down the sides of the bullet where the mould halves close and a slight increase in the bullet weight. In either of these situations, take a break (ending the session) and clean the mould and/or adjust the sprue plate.
Hopefully this article has provided some insight into why the weight dispersion of your bullets may not be as small as you’d prefer. There are many casting “tricks” and techniques that were not discussed such as how to better prepare you alloy, mould and ladle for easier casting, but I believe most of the important ones that affect bullet weights were covered.
And finally a word of advice for the newer BPCR shooters reading this, don’t get discouraged if your batch of bullets have a weight spread of 3 to 4grs or possible more. As you’re casting consider each step in your process and how it may affect the outcome. “Hang in there” and continue to load and shoot those less than perfect bullets as much as you can. Range time (aka trigger time), especially attending matches, will do a lot to refine your shooting technique and overcome most bullet weight variations. I believe I’ve developed a well refined casting process but have yet to shoot a master score although I’ve been close a few times. I expect to make master class in big bore silhouette competition one of these days but until then I’ll continue to blame my spotter.
Wishing you perfectly cast bullets and great shooting,
Wayne