Lengthening (Stretching) Short Brass To Fit Your BPCR Chamber
In an earlier article posted on this site titled, Shooting Short-Case Cartridges in BPCR’s – Myths & Facts**,** I discussed the subject of firing “short-case” ammo. The bottom line is it will not damage the chamber but expect accuracy to suffer to some degree. In another article titled, Determining Case Lengths**,** I covered several techniques to determine the exact length of your chamber and the preferred overall “fire-formed” case length. So, assuming you’ve measured the chamber and determined that the bunch of expensive brass you have is too short, what are your options?
You could purchase new brass, which may not solve the problem. The chamber may be longer than available new brass or longer than specified by the Sporting Arms and Ammunition Manufacturers’ Institute (SAAMI). And even if your chamber is SAAMI compliant, it’s very common to find new factory brass shorter than the SAAMI specifications. Of course, assuming it’s available; you could buy new brass for the same caliber but for a longer chambering and trim it shorter. An example is buying .45-90 brass to use in a .45-70 chamber after trimming. But this article is not about buying new brass. I will cover the three techniques that I’m aware of to lengthen the cases you already have.
Prior to discussing “realistic” options for stretching or lengthening cases I’d like to dispel any thoughts you may have of attempting to significantly stretch brass using unorthodox loading or chambering techniques. Brass can be “fire-stretched” by using a combination of heavy neck tension, crimping the bullet and lubricating the chamber wall, but it will take several firings to stretch it a significant amount. Plus, the likelihood increases that the case will completely separate. I suggest you read the article I wrote some time ago titled, Case Stretching & Separating in Black Powder Cartridge Rifles**.**
Case Stretching Options
Note - Should you succeed in stretching brass using one of the techniques discussed below, keep in mind that the ideal case overall length (COAL) should be close but no more than the overall length from the face of the breechblock to the transition step from the chamber to the throat after neck expanding and/or “fire-forming”. Although full length resizing will lengthen the case a few thousands, expect the case to shorten some when expanding the neck during reloading and from fireforming. I should also mention that the term “stretching” used here is somewhat of a misnomer since the following techniques lengthen the brass using a swaging process.
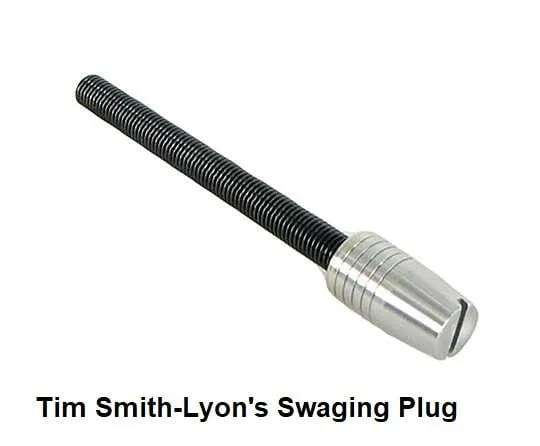
Tim Smith-Lyon’s Case Stretcher
For a simple and relatively cheap solution, Tim Smith-Lyon designed and a case stretcher (swage plug) that screws into a RCBS resizing die in place of the decapping rod. The thread on the stretcher stem is 1/4-28 which is compatible with RCBS’ die. Two versions of the stretcher are available for .40 caliber and .45 caliber brass, and can be purchased from Buffalo Arms (http://www.buffaloarms.com/). For an instructional video of Tim using the stretcher go to http://www.youtube.com/watch?v=rJQVNTvj5Lw. The current price is $39.95 plus shipping, and you will need a RCBS full-length or neck-only resizing die.
I’ve used the .40 caliber stretcher and it works as advertised, but it’s more work intensive and not as fast as the Kal-Max jig discussed below, but is much less expensive. Also, I strongly encourage you to anneal the necks prior to and after stretching. Annealing will result in easier stretching, nullify the work hardening of the brass induced by stretching and reduce the possibility of future case separations. Following the instructions, many small strokes of my Redding T-7 turret press were required to stretch new .40-65 Remington brass 0.010”. One has to definitely develop a “feel” for when the stretching is taking place. The stretcher is appropriately named a swage plug since the case is lengthened in the neck region due to a swaging process as the case neck is forced between the die and the plug.
In addition to the excellent instructions provided by Tim Smith-Lyon with the Case Stretcher I’ll attempt to provide some additional insight on how the swage plug works. When the press ram is raised and the already full-length or neck only resized case enters the resizing die, the swage plug stem must be screwed down sufficiently so that the plug is lowered to allow it to fully enter the case below the mouth prior to the case fully entering the die. Once the plug is inside the case, slowly and in very small increments the stem is unscrewed (backed out) thereby raising the plug as the press is cycled. As the plug nears the smaller inside diameter (ID) of the case neck the case wall is swaged (squeezed) between the die and plug. The result is a thinning of the case wall and lengthening of the case.
The process not only uniforms the neck wall but as noted also thins the neck wall slightly, which may or may not be an advantage depending on your chamber and bullet dimensions. The Remington brass neck wall thickness went from 0.0105” to 0.0095” as the case was stretched 0.015”. Continuing the process, I was able to stretch annealed cases 0.030” with a resulting neck wall thickness of 0.0090”. Additional stretching may be possible, but I quit after reaching 0.030”. Tim suggested that the maximum he would recommend stretching Remington brass is 0.025”. He also indicated that a liberal amount of case lube, more than would be used just resizing the brass, makes the stretching noticeably easier. Tim uses RCBS water soluble Case Lube-2. I used what I had handy, which is RCBS’s original case lube (not water soluble).
After extensively and successfully using the .40 caliber stretcher and subsequently posting this article some time ago I’ve become aware of a couple of problems with some of the stretchers. Based on Tim’s design dimensions the stretchers are produced at a machine shop on CNC equipment. One batch of the .40 caliber stretchers were manufactured with diameters slightly too small, and some of the .45 caliber stretchers are a bit too large. I have one of the .45 caliber stretchers and had to reduce the diameter by 0.002” for it to work properly.
To determine if your plug is the correct size if it does not seem to work properly, full length or neck-only resize a case using your RCBS dies. Measure the inside diameter (ID) of the case neck. The plug OD) should be approximately 0.002” larger than the ID of the case mouth but slightly smaller or larger may work. Since some of the RCBS resizing dies can vary by as much as +/- 0.0025”, if you have a problem, it may not be because the plug does not meet the design specifications but due to the die dimensions. Sizing a .40 caliber case should result in an ID of about 0.404”, and close to 0.450” for a .45 caliber case, give or take differences in brass wall thicknesses.
Keep in mind that the case diameter will spring back (slightly enlarge) when it’s removed from the sizing die. And to work the plug diameter must be slightly larger than the case mouth ID when both are inside the sizing die. If the plug is too small it won’t work. But if the plug OD is too large it’s simple to reduce the diameter by 0.001” to 0.002”. Even if you have a lathe, it may be easier to chuck up the plug in a drill press and use 200 grit sandpaper or emery paper with a file or flat piece of wood as a backing to reduce the diameter, then polish it using 400 to 600 grit. Don’t get aggressive. Using trial and error, take a off a little and try it. The plug should slide into the mouth of a resized case by hand with some resistance.
I recently stretched 100 Remington .45-70 cases using the swage plug. Once you develop a “feel” for the process, depending on the amount of stretching necessary, it should require about 30 seconds to a minute per case. The chamber in my Browning accepts a case OAL of 2.115” and the brand-new brass was 2.095” from the factory. My goal was to end up with loaded cartridges with the brass 0.005” less than the OAL. Based on my results, the following recommendations and comments are in addition to the instructions provided with the swage plug:
- The 1st step is to clean the brass and the resizing die. The stretching process results in a lot of pressure, both on the internal surface of the resizing die and the swage plug. If there’s any grit on the outside or inside of the case it’s likely to deeply scratch the contact surfaces.
- Use plenty of lube, more than when resizing. I used a Q-tip lightly dipped in the lube to lube both the outside and inside of the neck.
- Since the case lip is likely to have some peening from the factory or from your cleaning with ceramic media or stainless-steel pins, expect to feel some roughness as the plug enters the case mouth. The roughness should diminish during the stretching process. By the way, the plug grooves are used to help hold the lube.
- The lengthening process happens on the down stroke of the press, so don’t force the lever down too hard or the case will be tightly trapped and locked between the plug and the die wall, or the case can crumple.
- Knowing that when the necks of my full-length sized cases are expanded to accept a “finger seated” bullet the case will shorten approximately 0.005”. Also, from experience I’ve found the case will further shorten another 0.005” or so when fireformed.
- Therefore, I stretched them 0.025” longer than the factory length resulting in an OAL of 0.215” prior to neck expanding and fireforming.
- Of course, the process can be repeated if the cases end up too short after firing.
Update 4/2/20:
As reported above; after reducing the diameter of the swage plug slightly in order for it to work with resized brass, a bunch of Rem. .45-70 brass was lengthened 0.025”. But some were needed about 0.010” longer, lengthened a total of 0.035”, for a rifle with a longer chamber. The first 0.025” was relatively easy after annealing. But due to work hardening of the brass another annealing was required prior to lengthening the additional 0.010”. Since the case was not fully inserted into the RCBS sizing die after stretching the 1st 0.025” I figured correctly that I could get a little more length. It turns out that 0.035” is the limit based on the OD of my swage plug, the ID of the sizing die and the brass wall thickness, but a 2nd annealing was required.
If you’re planning to lengthen Winchester or Starline brass, understand that the maximum lengthening will be determined to a large extent by the wall thickness. Based on some case sectioning and measurements I did some time ago the typical walls thicknesses are: Remington 0.012”, Starline 0.011” and Winchester 0.010”. The article is titled, Comparison of Remington, Winchester and Starline Brass.
Kal-Max Case Stretching Jig (KMCSJ)
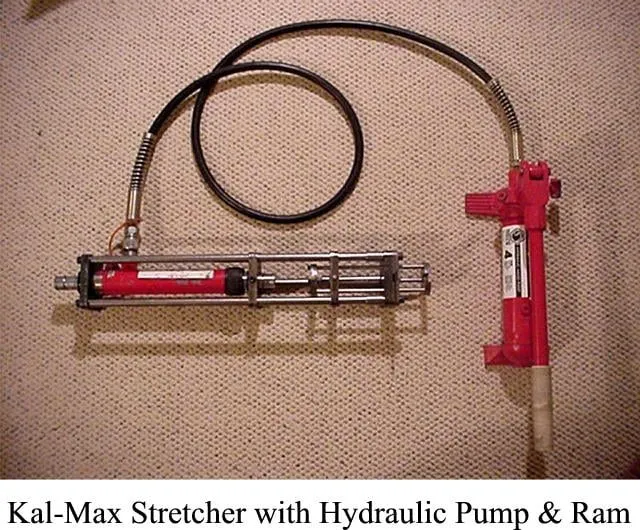
If your short brass is Remington, Starline, Winchester or Bell brand in .38, .40 or .45 caliber, another option is to purchase the more expensive Kal-Max Case Stretching Jig. I highly recommend the KMCSJ for stretching brass, but considering the price ($185 + shipping at the time of this writing) plus the additional hydraulic pump and ram unit ($100 to $250), it may not make sense to purchase the setup to stretch a hundred cases or so. Once the jig and ram are set up and adjusted, the stretching process is relatively fast. For a short video showing the KMCSJ in actual operation go to http://www.youtube.com/watch?v=oGzQsrPT4Qs. The hydraulic pump and ram (the two orange-colored units in the video) are not included with the KMCSJ and must be purchased separately or rented.
For pricing and more details on the KMCSJ, go to http://kal.castpics.net/CaseStretcher.html or contact Charlie (Chuck) Maxwell (aka Montana Charlie) at cmmontana@gmail.com. There’s more than one source of a suitable 4-ton hydraulic pump and ram. Porto Power makes one, but the best deal I found is the Central Hydraulics Portable Puller (model # 44899) from Harbor Freight. I picked up one on sale for significantly less than the regular price of $99.99. You may also be able to rent one from a local equipment rental company.
Using the KMCSJ, I stretched brand new .45-70 Remington brass 0.008” at the minimum setting and 0.037” at the maximum setting. The potential stretching range depends on the wall thickness at the central portion of the case. Within the total range the amount stretched is determined by the adjustable punch. The punch comes with several thin washer-like spacers. Maximum stretching is achieved when the punch, with no spacer, is seated as deep as possible in the case. Due to the tapered walls of the case (walls get thicker towards the rim) the deeper the punch seats in the case the more it stretches the case as the punch and case are forced through the die. The finished brass no longer has tapered walls where it was stretched, which was typically in the middle of the case. The case wall thickness in the neck region is not changed.
The initial brass I stretched was not annealed, but all subsequent brass was annealed prior to and after stretching where the stretching was taking place on the case body. Although many shooters using the Kal-Max do not anneal prior to or after stretching I suggest 1st determining the location where the brass is being stretched and anneal accordingly. Annealing will result in easier stretching, nullify the work hardening of the brass induced by stretching and reduce the possibility of future case separations. Certainly, annealing the middle of a case and ensuring the retained heat does not anneal the head area can get tricky. I lined up the cases in a shallow pan with water covering the head and annealed in a dark room with two hand-held torches. Holding a torch in each hand, I moved down the row heating both sides of each case at the same time.
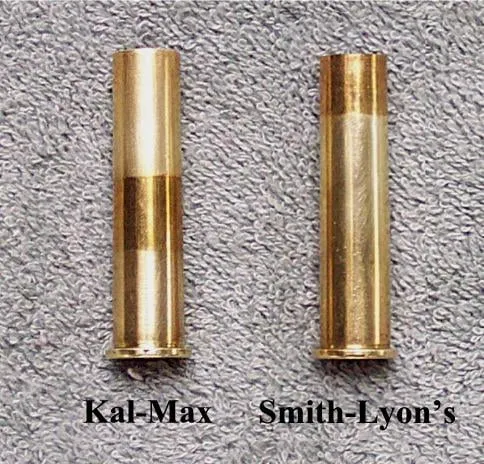
Kal-Max versus Tim Smith-Lyon’s Stretcher
As noted in the above comments, the price, complexity, and the stretching process are different between the two solutions. Also, the location the brass is stretched is different. As displayed by the dark case discolorations in the following photo, the Kal-Max stretches the brass in the middle; the Smith-Lyon’s unit stretches the neck area. By the way, the discolorations were the natural result of brass oxidation over several months after being stretched. The discolorations will be easily removed during normal cleaning in a vibrator or tumbler.
Lengthing Brass with a Lathe
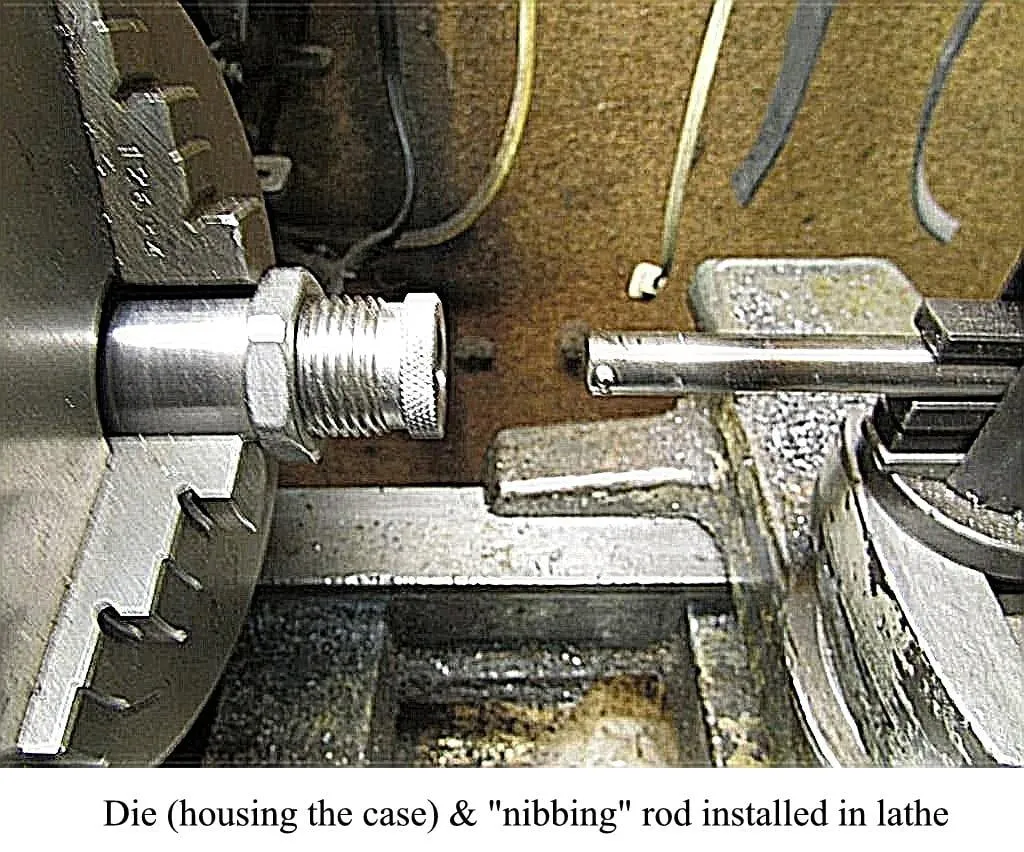
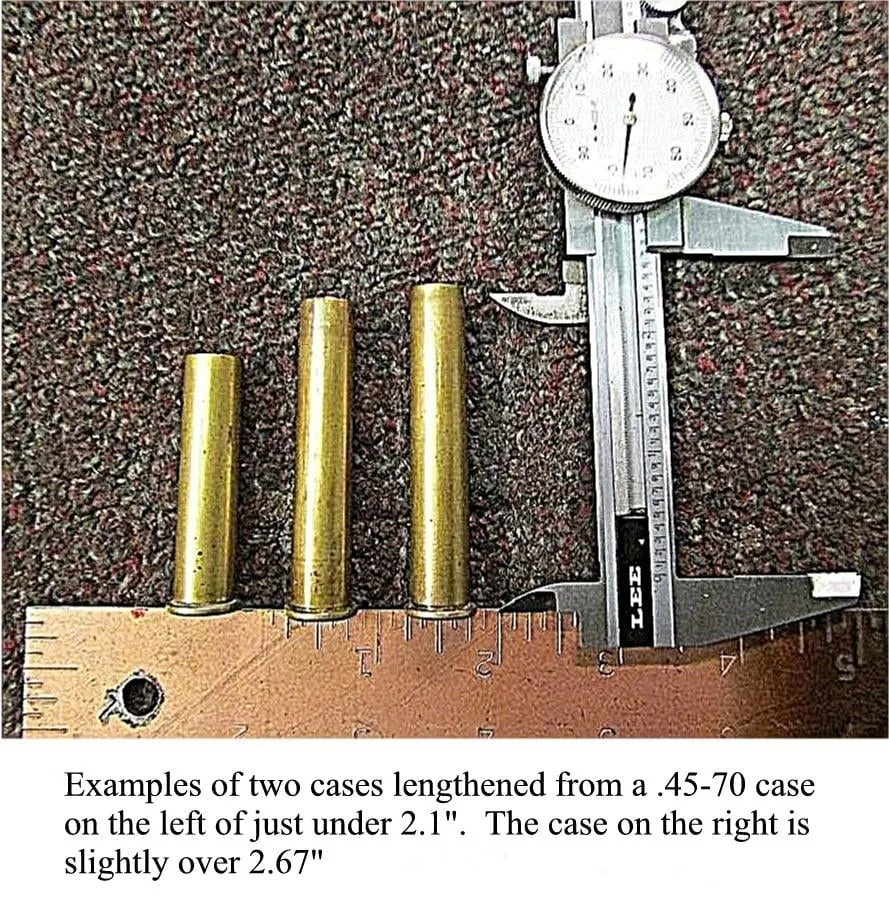
If you’re fortunate to have a lathe or a friend that has one, brass can be lengthened using a “nib & spin” technique. The process involves the use of a die to hold the case and a “nibbing rod”. The nibbing rod is similar to a boring rod but has a very smooth hardened bump on one side close to the end, or has a hardened ball bearing seated on one side to form the bump. A die, similar to a full-length resizing die, is constructed to rigidly house the case and hold it from turning. The die inside diameter (ID) must closely match the outside diameter (OD) of the case. The die and case are aligned and clamped in the chuck jaws. Once everything is setup, the nibbing rod is inserted deeply into the case at a point where the case wall is thicker. As the lathe is running the rod is adjusted so that the bump or ball bearing presses against the wall of the case and slowly “irons out” (thinning) the wall as the case spins and the rod advances towards the case mouth, hence the term “nib & spin”. As the wall is thinned the excess brass is forced forward lengthening the case.
The following photos were provided by Mike Deland, aka mdeland. Starting with a Remington .45-70 case on the left, the two long cases in the last photo required at least three nibbing passes, possibly more for the long one on the right. The middle case finished up at a very even neck wall thickness of 0.009”.
Note – New Remington .45-70 cases have typical neck wall thicknesses of 0.010” to 0.011”.
The Bottom Line
I hope the above details have been informative. Assuming you have some brass that requires lengthening the options are limited as noted. Very few shooters have the equipment and expertise to make the necessary die and “nibbing” rod to lengthen cases with a lathe. And spending $300 or more for a Kal-Max Case Stretching Jig is out of the question for most, especially considering the limited use of the equipment. So that leaves the Tim Smith-Lyon’s swaging plug as the only realistic option for the majority. Even if a RCBS sizing die must be purchased with the swaging plug, the total won’t break the bank so to speak.
By the way, if you have a bunch of cases to lengthen, I suggest posting on some of the Internet forums that you’re “looking” for someone with a Kal-Max unit that will stretch cases for a reasonable fee. I’ve run across a couple of threads where a Kal-Max owner has advertised his services as such.
4/24/20 Update (A Case Lengthening Tale)
Recently I had the need to stretch 200pcs of 45-70 Remington brass as much as possible. The brand-new brass was 2.095” long and the chamber of my Browning BPCR is 2.115”. From experience I know a new case will shorten about 0.005” when neck expanded to accept a bullet and will shorten approximately another 0.008” to 0.010” when fireformed. So, I needed a case with a COAL (case overall length) of 2.130” (0.035” longer than new), and that’s prior to trimming to uniform length.
The neck walls can vary in thickness 0.001” to 0.002”, possibly more, with any case, whether made by Winchester, Remington, Starline or others. When the case is lengthened using the Kal-Max or the swage plug, the swaging process will ensure the case wall are uniform where the swaging takes place. As noted in the article above, the Kal-Max lengthens by swaging the central portion of the case and the swage plug swages the neck. Regardless of the technique used the result is the case length will not be uniform around the perimeter of the lip. It will end up slightly longer on the side with the thickest wall. Therefore, trimming to uniform length is required and can result in removing another 0.015” to 0.020”. So now I needed to lengthen the case a total of 0.045” to 0.050” which neither technique was capable of doing.
Since I sold my Kal-Max Case Stretching Jig setup after completing the article the only method remaining was the Tim Smith-Lyons swage plug. The bottom line is I was able to stretch the Remington brass but it was a heck of a lot of work and required two annealing and two stretching steps. A 2nd annealing was required to remove the work hardening of the brass induced by the 1st swaging step. The best I could do was an average COAL of 2.130”, with a resulting length of 2.110” after trimming. The cases were then fireformed, resulting in an average length of 2.10”, 0.015” shorter than the chamber. The only other method to obtain cases of the ideal length is to purchase longer cases, .45-90 for example, then trim to length. If I did not already have the new Remington brass this is the approach I would have taken. In retrospect I should have bought .45-90 brass and kept the Remington for reforming into .40-65.
Wishing you great shooting.
Wayne