Haenel-K.K. Sport - Vintage German Single-Shot .22LR Target Rifle
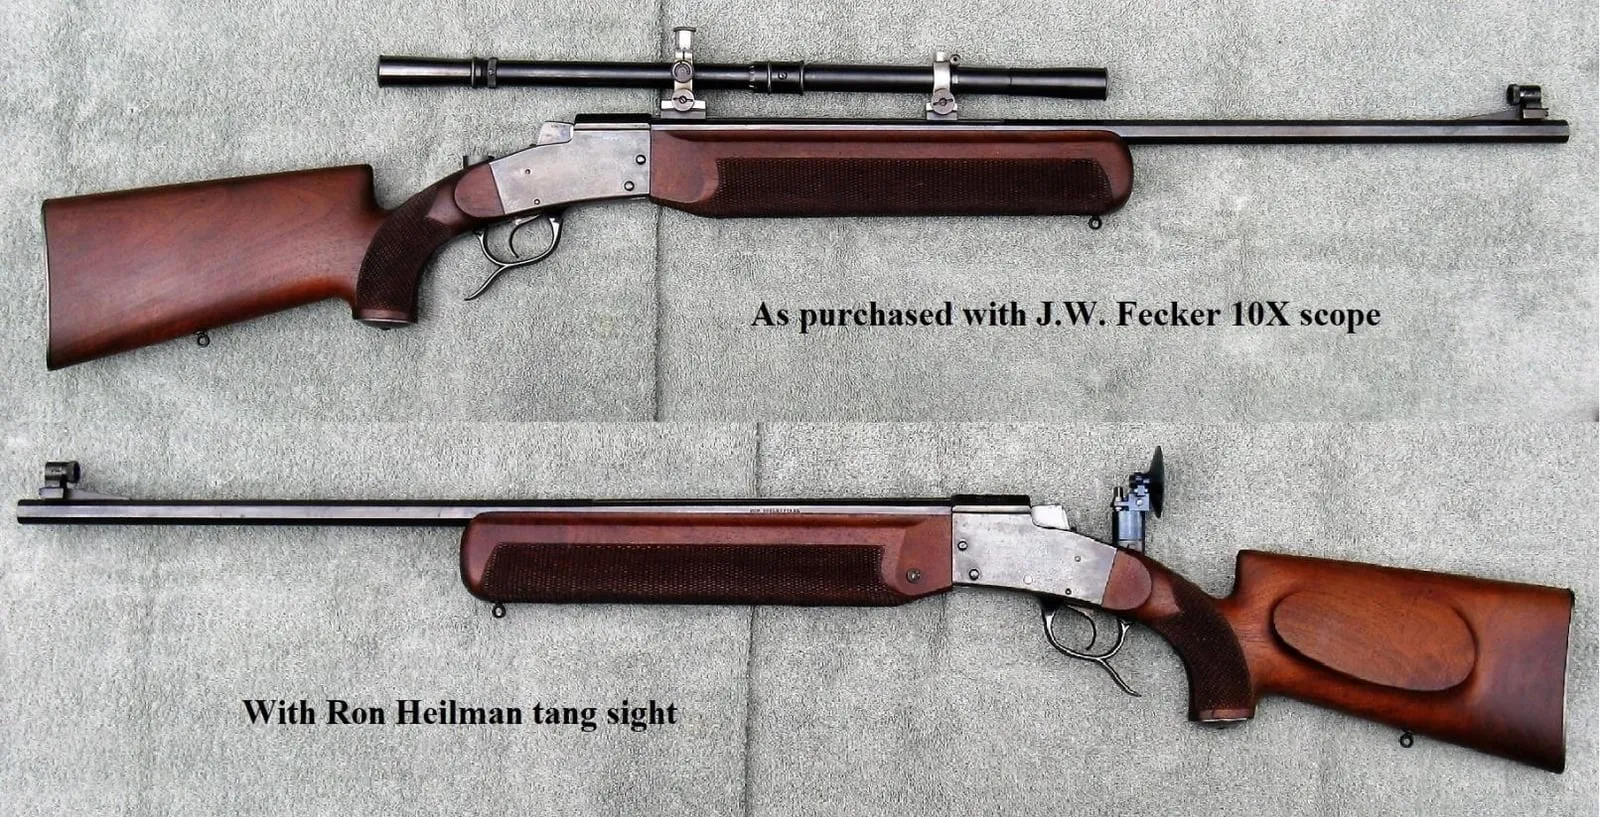
I was perusing one of the online firearm auction sites searching for J.W. Fecker vintage scopes and ran across the subject rifle which “caught my eye”. At the time I had never heard of a Haenel-K.K. Sport but it was pictured and being sold with a “Fecker” scope which I’ve very familiar with. Since I can always use and justify another .22LR target rifle and/or a Fecker scope, after researching the rifle model I bid on and won it. Following are photos of the rifle: as purchased and with a custom copy of the tang sight which was added later and is discussed in this article. By the way, although American-made, the excellent Fecker scope was manufactured approximately the same time as the rifle.
Before getting into the specifics on the models and details on my rifle, following is a bit of historical information which influenced the development and model name. Target shooting at paper targets with large-caliber weapons has been popular in Germany at least since the second half of the 19th century. In 1862 Germany already had 260 rifle clubs with over 7,000 members. In the USA, the UK, Austria and Scandinavia, target shooting was very active, but based on the .22 rim fire cartridge. The Germans, not having the necessary professional skills shooting small-caliber rifles, did not win in international competitions until the 1908 London Olympics. This was the impetus for the production of German sports weapons of small caliber (Kline Kaliber), hence the K.K. in the model name.
Although I was unable to pin down a more exact date range, the Haenel-K.K. Sport rifles were manufactured in the 1920’s to 1940’s, possibly a few years earlier, by the C.G. Haenel factory based in Suhl, Germany. Founded by Carl Gottlieb Haenel in 1840, the company was dissolved in 1945 as a result of Soviet occupation. In 2008 CG Haenel GmbH resumed operation in Suhl with Haenel’s original license and trademark rights and currently produces modern single-shot, bolt-action and semi-automatic rifles.
Based on the 534 date code on the bottom of the barrel and under the forearm of my rifle, it was manufactured in May 1934. Considering it’s almost 85yrs old with the expected patina on the barrel and receiver, and some dings on the stock and forearm, the rifles fit and finish is a prime example of fine German craftsmanship. No doubt some would consider it overdesigned for the .22LR, the only chambering available.
Haenel-K.K. Sport Models
Although online information on the rifles is limited, with the help of members from two forums I received details on the five models manufactured including the Olympia model. Good photos would have been nice but I could not find any worthy to include here. The following list is certainly not all inclusive since “special equipment” or accessories could be added to each model. A book by Bruno Guigues titled 145 German Smallbore Training Rifles displays several photos of the rifles. I’m tempted to purchase the book, but it’s a bit expensive and written in German. By the way, my rifle is a Model 4
- Model 1 - Slim forearm, regular pistol grip, no cheek rest, steel butt plate, tall inverted “V” front sight blade, rear barrel sight and tang sight.
- Model 2 - Similar to Model 1 but with “Emperor”-style pistol grip, regular cheek rest and the same sights as on Model 1.
- Model 3 - Large forearm, straight pistol grip, “Bavarian”-style cheek rest, globe-style front sight, rear barrel sight and the same tang sight as on Models 1 & 2.
- Model 4 - Very large forearm, “Emperor”-style pistol grip, regular cheek rest, rubber butt plate, smaller inverted “V” front sight, rear barrel sight and upgraded tang sight.
- Olympia Model - Many special features for the Olympic shooter including the following: double-set trigger, Olympic tang sight, globe-style front sight, Olympic adjustable butt plate, adjustable palm rest, “Bavarian”-style cheek rest and modified “Emperor”-style pistol grip.
Features/Details of my Rifle
When reading the following keep in mind that it’s a description of my Model 4 rifle with a few comments thrown in for clarification.
- Overall weight - Although Haenel did make lighter weight K.K. Sport models, the rifle I have is certainly not a lightweight .22 plinking or hunting rifle. With the aperture tang sight installed the rifles weighs 8lbs 14oz. It weighs 9lbs 12oz with the Fecker scope mounted and no tang sight.
- No safety - One feature or lack thereof which may be somewhat common, I have no idea, for vintage German made Schuetzen-style target rifles is the lack of any type of safety. Once the cartridge is chambered and the breech block fully raised the only way to disarm the rifle is to lower the breech block.
- Dry firing - Due to the firing pin and breech design, the rifle can be dry fired, as the old saying goes “until the cows come home” without any danger of damaging the firing pin, extractor or breech end of the barrel.
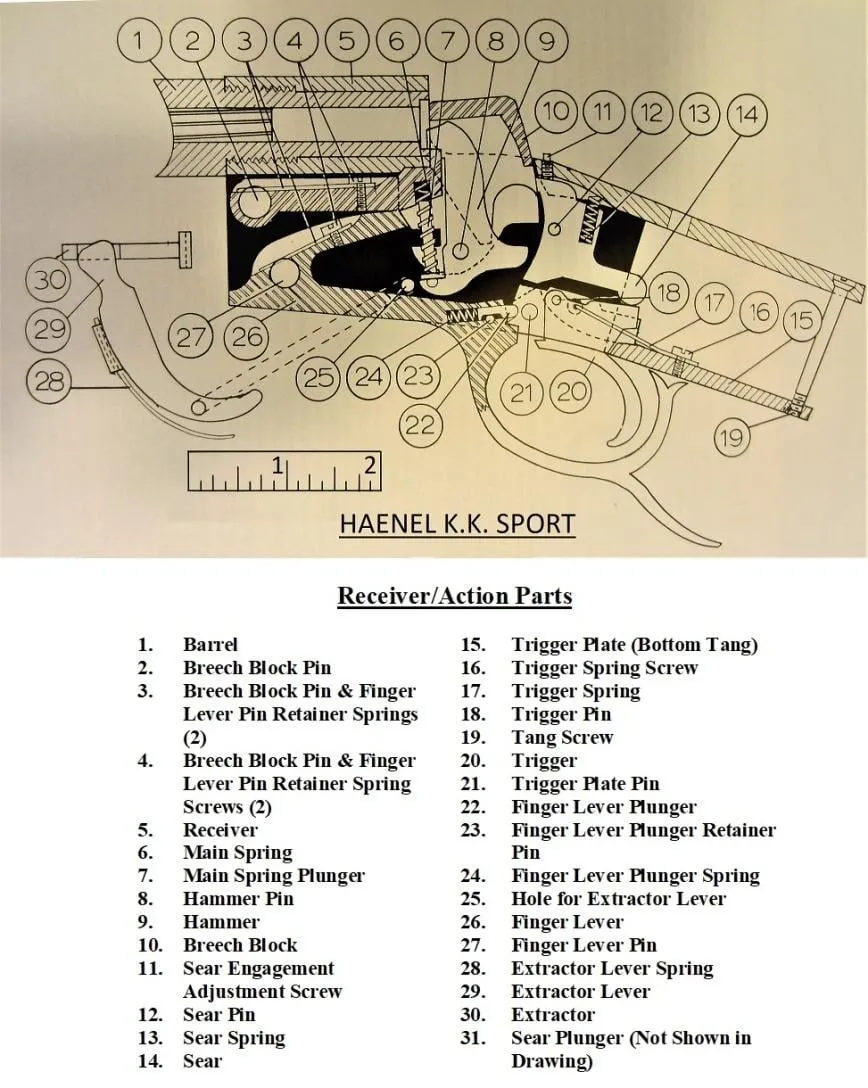
- Extractor - An example of fine German craftsmanship, the extractor seats almost invisibly into the breech and pushes the cartridge or spent case out approximately 1/2” when the lever is pushed down. Just dropping the lever will not extract the case. Since the extractor is spring-loaded closed by the extractor lever spring (28), see schematic and parts description, the lever must be pushed down to extend the extractor.
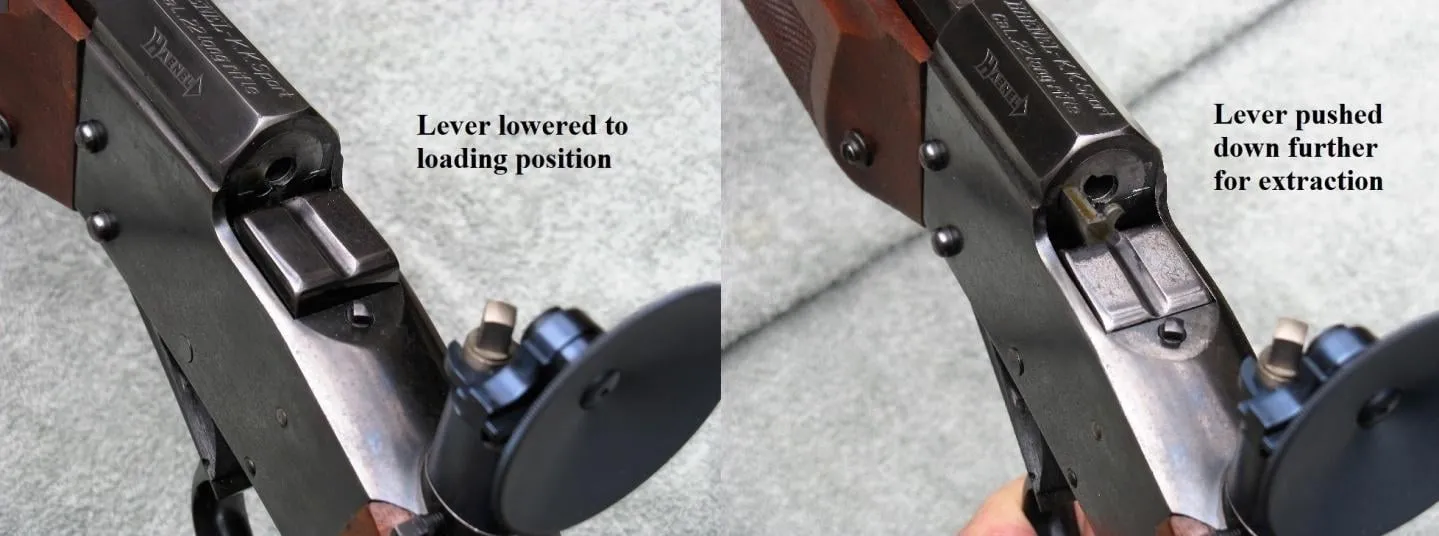
- Cocking - The internal hammer is cocked by closing (raising) the lever, not lowering it as is common with all single-shot rifles I’m familiar with.
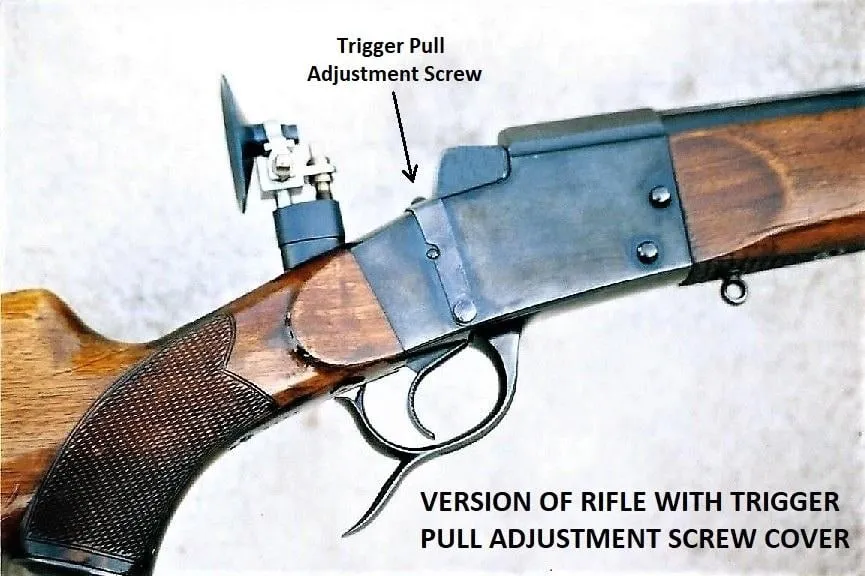
- Trigger pull adjustment - A small square-headed sear engagement adjustment screw (11) is located directly behind the breechblock and is used to adjust the trigger pull. Turning the adjustment screw clockwise will decrease the sear engagement thereby reducing the trigger pull. Although the screw can be turned by a small wrench the adjustment key used for the factory original tang sight also fits the screw head. By the way, as displayed in the following photo, some versions of the rifle came with a metal protective cover over the adjustment screw that extends down both sides of the receiver and is held in place by a different style of trigger plate pin. My rifle did not come with the cover or the compatible pin. One forum member responding to several of my questions said the cover strap is humorously referred to as “chastity pants”. I expect “chastity belt” would also be appropriate.
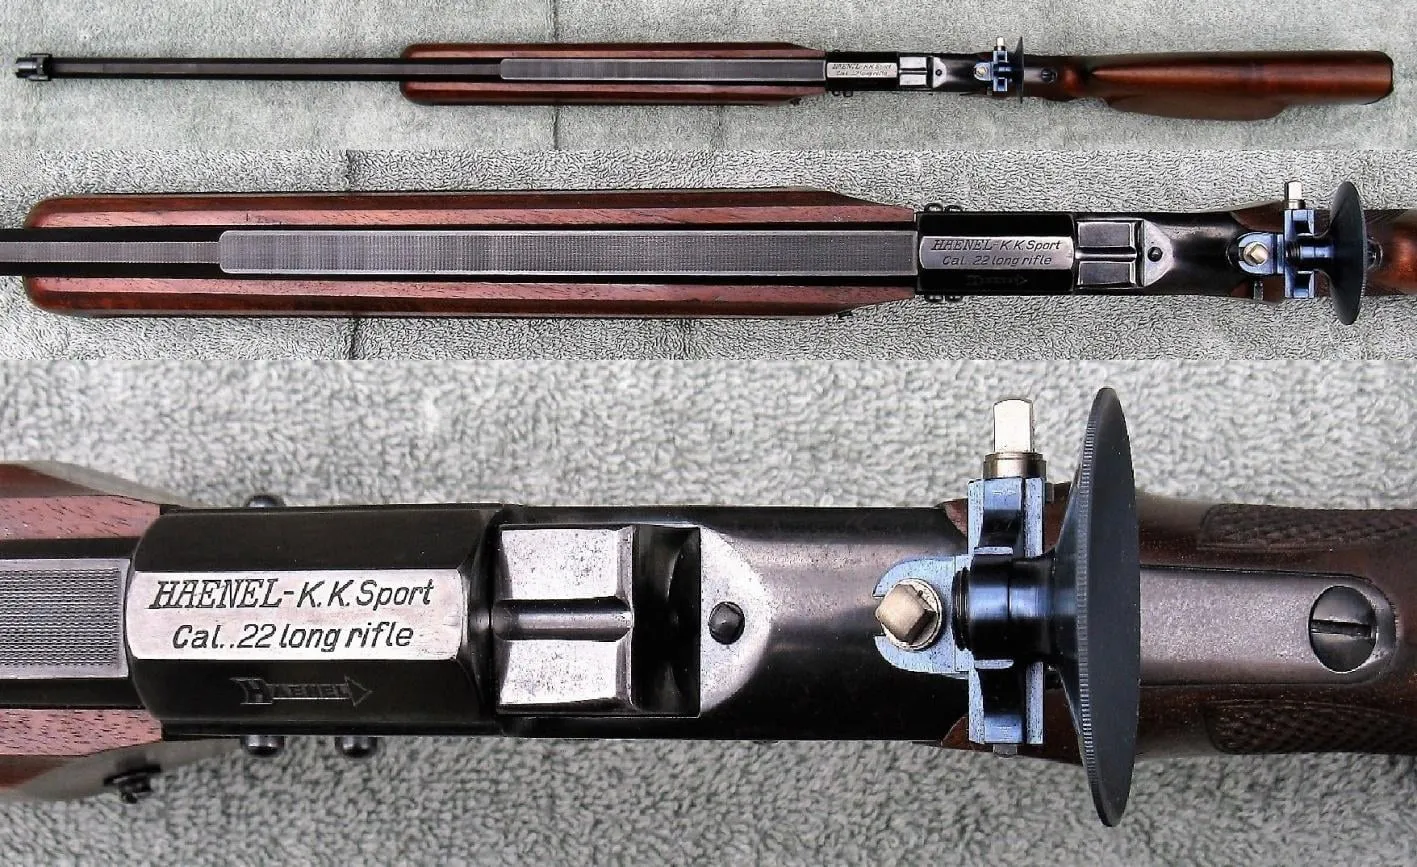
- Barrel antireflective top - The top flat of the tapering octagon barrel has a very fine ripple pattern along its full length. Besides being an attractive feature it’s an antireflective surface. It should also help dissipate barrel heat if shooting on a very hot day.
- Barrel top dovetail rib - The back half of the barrel has a 15mm wide dovetail top rib, also with the ripple pattern. The rib allows mounting a rear barrel sight at any location along the rib. The rifle came with custom slide-on locking adapter bases that mated with mounts for vintage Fecker or Unertl-style external adjustable scopes without the need to drill and tap the barrel. The adapters are made to lock in place at any location along the rib without marring or damaging the rib. If one wishes to mount a modern scope I know CZ Arms makes a 16mm to Picatinny/Weaver scope rail adapter that should fit the dovetail rib.
- Bore twist rate - By carefully measuring the twist rate it was determined to be 18:1. I expected something closer to the more common 16:1 found in my other American made .22LR target rifles. I did run some 100yd accuracy tests using 3 brands of 40gr target ammo. Although the conditions were not ideal due to variable winds the best groups were around 2”. I would expect the accuracy to improve under more idea shooting conditions and possibly with lighter weight therefore shorter bullets due to the slower twist rate.
- Forearm - Most of the large forearm is covered with checkering and it has a threaded recessed socket on the bottom near the receiver to accept a palm rest. Mounted on the left rear is an attachment stud identical to the sling attachment studs on the bottom of the stock and bottom front of the forearm. Not being a Schuetzen target shooter I assume it’s to attach some type of a device or sling to help steady the rifle. The stud was damaged on my rifle so I removed the damaged portion and formed the top into a screw-head with a slot. Note – on some versions of the rifle this stud is mounted on the bottom of the forearm very close to the front of the receiver. An example can be seen in the earlier photo of the rifle with the trigger adjustment screw cover plate.
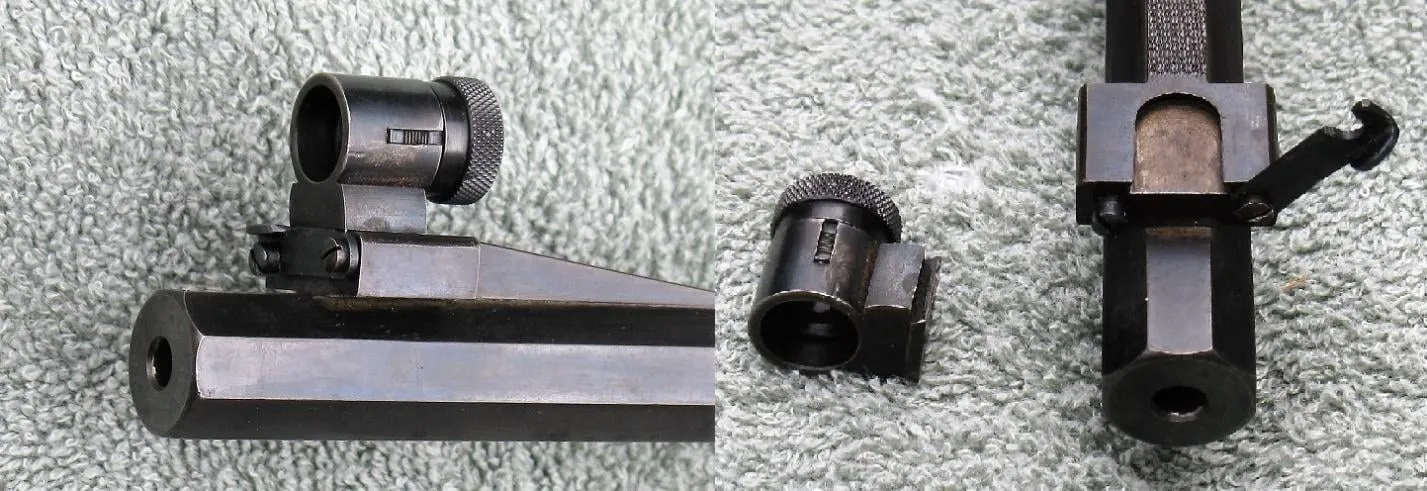
- Front sight - The rifles were available with at least three styles of front sights: two inverted “V” designs of different heights and a globe-style as seen on my rifle. The globe-style accepts various inserts. Lyman 17A inserts will fit. What makes the globe sight and other compatible sights somewhat uncommon, at least to American rifles, is they can be easily removed by opening a small latch on the front of the sight base and sliding out the sight assembly. It’s certainly an attractive feature and allows for easily switching sights or removing the sight from the field of view when using a scope.
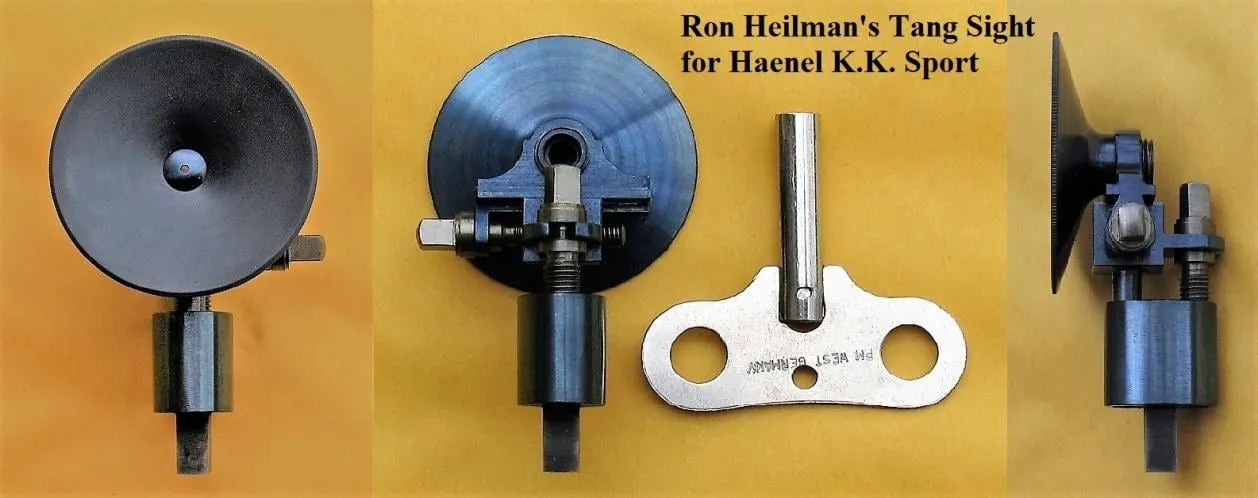
- Rear tang sight - The rifles were manufactured many decades ago so it’s common to find them being sold without the tang sight, or even without the front sight and/or rear barrel sight if a scope was used. Although my rifle obviously has a front sight it arrived with a vintage Fecker scope, no rear barrel sight or tang sight. Since finding original sights may be almost impossible, there’s a fellow that makes a new (close but not exact) copy of the standard tang sight available at the time for the Models 1 thru 3. The main differences are the adjustment screws use US/Imperial threads rather than metric and the square heads are larger. You may have run across some of his sights listed on GunBroker and/or eBay. His name is Ron Heilman. Ron is a craftsman of the first order. In addition to front and tang sights for the Haenel-K.K. Sport, he also makes custom front and tang sights for other German Schuetzen rifles. Following are photos of the tang sight Ron made for me. He can be reached at 253-840-2623 or r.a.heilman@att.net.
- Stock - The stock has a cheek rest and pistol grip. The grip design is referred to as an “Emperor Grip” vs. the normal style pistol grip pictured earlier on the rifle with the trigger pull adjustment screw cover and commonly found on American rifles.
- Butt Plate - The butt plate is finely checkered metal rather than the standard soft rubber butt plate the factory literature listed as standard on the Model 4.
- Rifle price - Around the time my rifle was manufactured the Model 4 retail price was approximately 155 RM (Richsmark) which was the German currency at the time. The exchange rate to US dollars was 2.61 RM to $1. Therefore, the rifle cost roughly $59. Adjusting for inflation the price would be around $1,100 today.
Disassembly/Reassembly
Prior to attempting disassembly I researched available online information and attempted to locate a schematic and direction on disassembling/reassembling the receiver. Already being a long-term member of the American Single Shot Rifle Association (ASSRA) forum, I also joined the German Gun Collectors Association (GGCS) forum. Although I found some limited general information, no schematic or disassembly instructions were available. After posting a request on the ASSRA forum I received a schematic and parts description from a very helpful member by the name of Rodney Storie (aka “rodneys”).
Disassembly
With the schematic and parts description in hand the receiver was disassembled which was relatively easy. Following are my notes from the process. I’m not sure if it’s required, but to be safe drift out the sear pin (12) and trigger plate pin (21) left to right with the rifle upright and the muzzle forward, reinstall in the opposite direction.
- Push out the large finger lever pin (27). The pin should come out easily since it’s being held in place by a retainer spring (3) that snaps into a detent groove around the center of the pin. With the forearm removed the end of the spring is visible.
- Remove the finger lever (26) which includes the trigger guard and the bottom of the receiver.
- Drift out the trigger plate pin (21). This pin will likely be different on rifles with a trigger adjustment screw cover which my rifle does not have. See earlier comments.
- Remove the trigger assembly.
- Drift out the sear pin (12).
- Remove the sear (14). Be sure not to lose the sear plunger (not shown in drawing) and sear spring (13) located in the top of the sear which can inadvertently fall out.
- Remove the extractor lever (29) and spring (28). After removing the lever and spring the extractor (30) should to be easy to remove since there should be nothing holding it in place, but it refused to come out all the way with a moderate amount of force, so I pushed back in and fully seated it in the normal retracted position. I expect there was a burr holding it in due to the close machining tolerances.
- Push out the breech block pin (2) that holds the breech block and hammer assembly. It should come out easily as did the finger lever pin (27).
- Remove the breech block and hammer assembly.
No attempt was made to further disassemble the trigger assembly and breechblock assembly. Disassembling the trigger assembly should be straight forward and easy, but I expect that removing and reinstalling the hammer into the breechblock assembly could be a bit tricky due to the strong hammer main spring.
Reassembly
To reassemble everything, follow the above directions in reverse order and see the following notes:
- When installing the large pins (2) and (27) you may not feel or hear the retainer spring snap into the detent groove so push them in until they protrude evenly out both sides of the receiver.
- When installing the trigger assembly, be sure the extractor lever spring (28) is compressed by the trigger assembly. I.e. with the receiver upside down, compress the spring below the trigger assembly as the assembly is lowered in place and the trigger plate pin (21) is being installed.
Closing Comments
With its large forearm, no safety, able to accept a palm rest, tang sight and other attachments, the rifle is clearly designed to be a target rifle. Unfortunately, due to its internal hammer it’s not legal to use in sanctioned “official” .22BPCR matches. And due to its size and weight (around 9lbs or more depending on installed sights) it’s not intended to be easily carried around in the woods or field, squirrel or rabbit hunting. But each time I pick it up and admire it, it “grows on me”. It’s a “keeper”.
Wishing you great shooting,
Wayne