Determining Case Lengths
Prior to jumping into the following discussion, I should make it clear that my comments on determining case lengths are limited to rimmed straight-wall cases that seat on the case rim when chambered. Similar methods are used for bottleneck rimmed cases but will not be discussed here.
Firing a black powder cartridge (BPC) rifle with a case that’s either too long or too short can have a direct affect on accuracy and lead to other problems. A case that’s too long can result in increased chamber pressures and will affect accuracy due to bullet deformation and possible base fining. A case that’s too short is the most common situation. One result of a short case is lead accumulating in the gap between the case lip and the chamber transition step. Depending on the gap width and the position of the bullet driving bands and lube rings in relation to the gap, the gap may fill with lube or lead from the expanded bullet. Assuming the gap is filled with lead, as the bullet moves forward the lead will either be smeared back onto the bullet, resulting in “finned” driving bands, or stripped off and deposited in the chamber transition step as a lead ring. For an additional discussion on shooting short-case cartridges see my article titled, Shooting Short-Case Cartridges in BPCRs – Myths & Facts Concerning Chamber Rings & Accuracy. While reading further, keep in mind that one of the keys to improved accuracy is minimizing bullet deformation.
The location of the chamber transition step is the key element in determining the correct case length. The transition step defines the forward edge of the chamber. It’s the short, angled region where the chamber narrows down to the smaller groove and bore diameters of the throat and bore. A typical chamber transition step angle is 45 degrees, but the angle can be much less for chambers designed to handle grease groove (GG) and paper patched (PP) bullets, and is a necessary part of accurate chamber and bore designs of cartridge firing rifles. It allows the chamber to accept the larger diameter of the cartridge case and fire a smaller diameter bullet to match the bore diameter while minimizing bullet deformation.
Note: The Miroku manufactured Browning and Winchester chambers have a 12.5-degree transition step angle.
The ideal case length of a fire-formed (fired but not resized) case positions the front edge (mouth or lip) of the case so that it almost comes into contact with the rear edge of the chamber transition. My definition of “almost” leaves some space (not much) for case stretching under firing conditions. The case may initially stretch a few thousands of an inch when fired then retract. Therefore, if the mouth is in hard contact with the chamber transition, “fire crimping” can result, essentially rolling over the lip and “squeezing” the bullet to a smaller diameter as it exits the case. Since the relatively soft cast bullet will expand (obturate) to fill the throat and bore, increased fining of the base edge caused by fire crimping the case mouth may have a negative effect on accuracy. Once the maximum case length (mouth edge in hard contact with the chamber transition) of a fire-formed case has been determined, I recommend shortening the case 0.005” or so to eliminate the possibility of fire crimping. To determine, with a higher degree of accuracy, how much your cases stretch, if any, when fired will require further experimentation on your part.
So how does one determine the maximum case length? There are five methods that come to mind. But regardless of the method used, an accurate determination of case length must include the chamber length and head clearance. See figure 2 for an illustration of head clearance.
Following are two quick and easy methods that result in a rough approximation of case length, which should be sufficient for most shooters. The third and forth method consists of utilizes a sulfur chamber cast or a fusible alloy chamber cast commonly referred to as a CerroSafe cast. The final method makes use of an impact impression of the chamber and throat. All will work but, as will be noted, there are benefits and tradeoffs associated with each technique. For details on making a chamber cast or impact impression, refer to my article titled, Chamber Casts & Impact Impression.
Quick Methods
Neither of the quick methods discussed below will provide diameter dimensions of the chamber, throat, or bore. And both techniques require a case that is slightly longer than the chamber being measured. Someone that’s reforming longer and larger caliber cases to use in a smaller caliber rifle will find the process a little easier. The reformed untrimmed case will generally end up longer than required, a good thing for this exercise. One example is reforming a .45-70 case to fit into a .40-65 chamber. Another example is to use a .45-90 case for measuring a .45-70 chamber or reforming a .45-90 case to use in a .40-65 chamber.
Quick Method 1
As already noted, this method requires a case longer than the chamber. A full length resized .45-90 case was used for a .40-65 chamber. The neck of the case must be annealed to the softest condition possible. I stood the case up on a brick and heated it with a propane torch until the neck area glowed red then allowed it to cool. To quickly cool the case and speed up the process a bit, drop it into the water which will not harden the brass as it would steel. Now lightly lube the outside of the case and insert it into the chamber.
Using a wooden dowel and hammer, or similar tools, drive the case in until the rim fully seats. The soft brass will not damage the chamber or bore. Using a long wooden dowel or metal rod inserted down from the muzzle, gently extract the case. The location of the transition step should be obvious but the starting edge will not be well defined. Refer to figure 1 below.
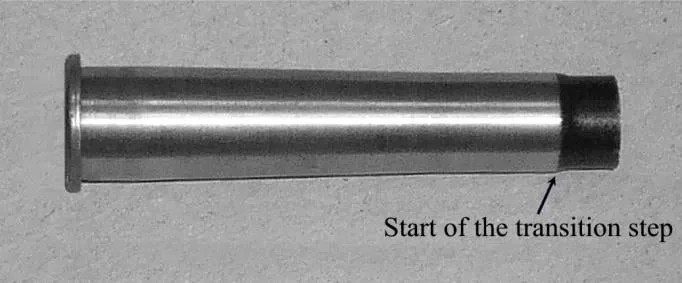
Figure 1
To identify the rear or starting edge of the step, a permanent marker was used to blacken both sides of the step. Then, using very fine sandpaper on a flat surface, the black area on the chamber side of the step was removed by gently rotating and sliding the case across the paper. The remaining edge of the black portion clearly defined the start of the step. Measuring the length to the start of the step results in a close approximation of the case overall length. Using this method and adding head clearance, I was able to determine the case length to within 0.005” of the actual length in my rifle.
One drawback to this method is it can be a little “tricky” to determine the exact start of the chamber transition, but your measurement should be close enough. If the lands and grooves show up on the end of the case, I do not recommend measuring them to determine bore diameter dimensions. “Slugging” the bore with soft lead will provide accurate measurements of the groove and bore diameters. Another drawback is the technique does not take in account head clearance, which will add typically 0.003” to 0.006”, possibly more, to the measured length depending on the thickness of the case rims. For a discussion on head clearance, refer to Figure 2 and comments below.
Quick Method 2
The following technique also requires a case longer than the chamber. As in the “Quick Method 1” above, a full length resized .45-90 case was used for a .40-65 chamber. Expand and then flare the mouth of the case so the flared portion can be felt dragging on the inside of the chamber wall when it’s being pushed in. Continue to push until it comes to a hard stop, indicating the mouth or lip of the case has hit the start of the chamber transition. Using the rear end of vernier, dial or digital calipers as a depth gauge, measure the amount of the case that’s sticking out of the chamber. Subtract the amount from the length of the extended case. Adding head clearance results is a very close approximation of the maximum case length. I found this technique to be faster and slightly more accurate than “Quick Method 1”.
Note: Depending on the rifle, chamber transition angles can vary from 45 degrees to much less. If the angle is very shallow, i.e. a few degrees, this method may not work very well. The technique also has the same head clearance drawback as noted in “Quick Method 1”. For a discussion on head clearance, refer to Figure 2 and comments below.
Utilizing a Chamber Cast or Impact Impression
Chamber casts and impact impressions are excellent tools for accurately determining correct case lengths. Both clearly define the starting edge of the transition step, typically resulting in a higher degree of measurement accuracy than does Quick Method 1 and Quick Method 2 discussed above. For details on making a cast or impact impression, refer to the article titled Chamber Casts & Impact Impressions.
Measuring the chamber length using a sulfur or CerroSafe cast is straight forward and simple and there’s no need to discuss it further here. But neither includes headspace, which is also required for accurately determining case lengths.
Utilizing an impact impression is an excellent method for determining case lengths. Measuring the impression from the rear of the rim to the start of the chamber transition includes the actual headspace of the rifle and will provide the correct case over-all length (OAL) of a properly trimmed fire-formed case.
Head Clearance and Headspace
Following is a short discussion on head clearance and headspace. As defined by SAAMI (Sporting Arms and Ammunition Manufacturers’ Institute, Inc.), Head Clearance is “The distance between the head of the fully seated cartridge or shell and the face of the breech bolt (breechblock) when the action is in the closed position”. SAAMI includes a comment that head clearance is commonly confused with headspace, so don’t make that mistake. Headspace is “the distance from the face of the closed breech of a firearm to the surface in the chamber on which the cartridge case rests”. Therefore, in full agreement with SAAMI’s definition, the headspace of a rimmed cartridge rifle is measured from the face of the bolt or breechblock to the bottom of the rim seat which stops the cartridge from moving forward and is clearly illustrated in Figure 2.
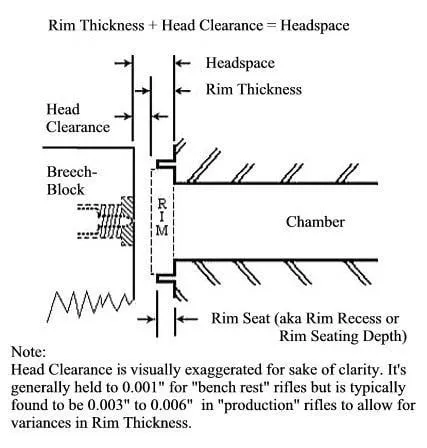
Figure 2
Wishing you great shooting,
Wayne