Chamber Casts & Impact Impressions
Chamber casts and impact impressions are invaluable solutions for measuring the chamber and throats of the vast majority of rifles. They are also ideal for determining accurate dimensions for bullet moulds, bullets and case lengths. The steps involved in making a cast or impression are detailed in this article. The advantages and disadvantages of each technique are discussed to help the reader decide the best method to use.
Sulfur Chamber Casts
Prior to the development and use of CerroSafe for chamber casts, the time-honored technique used a melted mixture containing mostly sulfur, commonly known as the “Baker Mixture”. Sulfur does offer a couple of benefits: it’s cheap and readily available from local home and garden supply stores or pharmacies. Although high purity pharmaceutical grade sulfur is not required for a chamber cast, it is available in several forms. Flowers of sulfur, also known as sublimed sulfur is made by sublimation and is the most common. Two other forms are precipitated sulfur, also known as milk of sulfur, and washed sulfur.
I have not used sulfur for chamber casts, but researching the subject highlighted several negatives. It’s somewhat dangerous to melt and can ignite with an almost invisible flame. It can be very messy and hard to clean out if the chamber is over filled and the sulfur runs into or is accidentally spilled into the action. And sulfur casts are very brittle and somewhat fragile. In addition, when using sulfur casts to determine case lengths, headspace cannot be directly measured.
Roy F. Dunlap covers the technique of using sulfur in his very well-know book titled Gunsmithing, first published in 1950 and followed by a 2nd edition in 1963. Videos detailing the process are also available on YouTube. Following is one shooter’s procedure I found during an Internet search.
The chamber and a portion of the bore should be clean and swabbed with a very light coat of lubricant or WD40. From the muzzle end, push a tight patch down the bore to about ½” ahead of the throat. After removing the stock and/or forearm, mount the well-padded receiver and barrel in a vise. Slowly melt the sulfur over low heat, being cautious that it does not catch on fire. Heat the barrel and the chamber area with a propane torch or hot air gun until it’s just too hot to hold. Plug the extractor slot. Now carefully pour the melted sulfur into the chamber all the way to the top. A funnel shaped depression will appear in the center which is normal. Wait several minutes for the chamber to cool some and gently knock the cast out with a rod from the muzzle end. Be sure to catch it. If measurements are taken immediately, the cast will be about .0001” smaller than actual chamber and bore dimensions. Within a few hours the cast will not shrink more than .0005” which is certainly close enough. After more time has passed the cast will eventually shrink .001”. Here’s a link to a YouTube video on making a sulfur chamber cast: http://www.youtube.com/watch?v=j8jE2o7ePbo.
CerroSafe Chamber Casts
Comments & Cautions
The most common chamber cast materials in use today are “fusible alloys”, generally referring to a metal alloy that melts at relatively low temperatures; typically, below 361°F (the melting point of lead tin eutectic solder). The best-known fusible alloy for firearm chamber casts is sold under the CerroSafe brand.
Prior to discussing the steps involved in making a CerroSafe chamber cast, I will briefly cover some background information on the alloy and the company that currently produces it. Until 2007, CerroSafe was made by Cerro Alloys, hence the CerroSafe brand name. Bolton Metal Products acquired Cerro Alloys from Cerro Metal Products in February 2007. The fusible alloy is now officially listed on their website as Bolton 160/190 in reference to the melting range but it’s still supplied in ½ lb ingots under the CerroSafe brand. Bolton Technology is headquartered in Bellefonte, Pennsylvania. Although RotoMetals, another manufacturer, calls their version Chamber Alloy (158-190), throughout the following discussion I will refer to the alloy as CerroSafe for simplicity.
CerroSafe is comprised of bismuth (42.5%), lead (37.7%), tin (11.3%) and cadmium (8.5%). Bismuth is the essential ingredient, the percentage of which determines if the alloy will shrink or expand after a cast is made. CerroSafe has a melting range of approximately 158°F to 190°F. It’s available from gunsmith supply companies and several firearms accessory retailers in ½ lb or larger ingots. I’m currently aware of five retailers. Brownells, MidwayUSA, Buffalo Arms and Track of the Wolf sell CerroSafe supplied by Bolton Metal Products. RotoMetals manufactures their version of a fusible alloy, reportedly using the same alloy formula used in CerroSafe. Per equivalent weight, RotoMetals current price is about 1/2 that of CerroSafe. There may be other suppliers. The typical fusible alloy cast of a .45-70 chamber, including the throat, weighs approximately 3.4 oz; a .45-90 cast a little more, a .40-65 cast a little less. Therefore, a ½ lb ingot should be more than sufficient to make two casts.
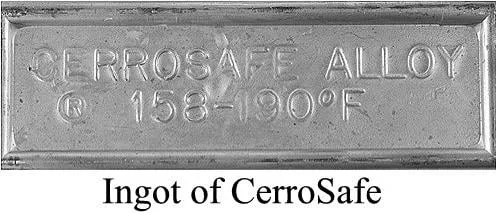
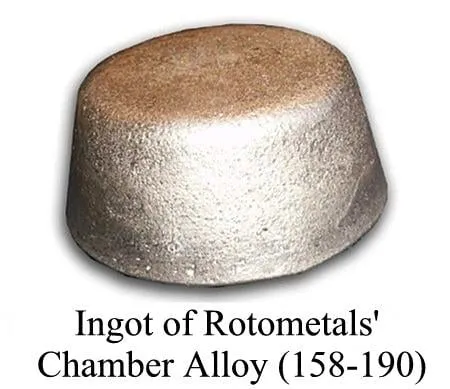
A few words of caution are warranted concerning handling an alloy containing lead and cadmium. We are all aware of the harmful result of inhaling or digesting lead. Cadmium is even worse. Although the percentage of cadmium in CerroSafe is relatively small, it’s considered toxic even in low concentrations and will bioaccumulate in organisms and ecosystems. As an example, the permissible exposure limits (PEL) of lead is 0.05 parts per million (ppm). For cadmium it’s only 0.01ppm. Repeated or prolonged exposure to cadmium can damage the kidneys, lungs and/or liver. So, use extra caution and be sure to wash your hands when melting and handling CerroSafe or similar fusible alloys, or casts made from fusible alloys.
If all you need is one or two casts and have no plans to measure the cast dimensions again, ignore the discussion on CerroSafe’s expansion rates except for the important 1.5 hr measurement point. But if you plan on keeping the cast for future measurements than a clear understanding of the expansion characteristics is necessary to ensure the data accurately represents the true dimensions of the chamber, throat and rifle bore. An in-depth discussion on expansion characteristics follows the details on making a cast.
Making a Fusible Alloy Chamber Cast
The following steps detail how I make a chamber cast. No doubt there are many variations used by others. For one example, here’s a YouTube video made by Midway USA’s Larry Potterfield: https://www.youtube.com/watch?v=KgRp3r9VPE0. Larry leaves out some of the details but the video will provide a general idea of the process.
It’s well known that once the cast is poured CerroSafe shrinks and then starts to expand over time as it “ages”. Some suppliers note that the cast will match the chamber dimensions 1hr after the cast is made. In a controlled experiment I determined 1.5 hrs is a better estimate of the ideal time to take measurements. Measurements taken before or significantly after 1.5 hrs will require a mathematical adjustment. There’s no need to rush, a few minutes one way or the other won’t make a significant difference, but 30 minutes to an hour will if precise measurements are required. Have a caliper or micrometer handy and determine what data is needed prior to the measurement time. If the preferred time interval is missed, adjustments to the data will be necessary (see later instructions) or remake the cast.
- Disassemble the rifle as needed to gain access to the chamber.
On many single-shot rifles it is only necessary to remove the forearm in order to heat the barrel chamber and throat. Although disassembling the firearm is not mandatory and may not be recommended for some rifles, I find it simplifies and helps when making a chamber cast for two main reasons: it allows sufficient access to pour the alloy in the chamber without the need of a pouring tube and also eliminates or at least reduces the possibility of spillage into parts of the action.
A rifle that does not offer good chamber access may require a funnel and tube to reach the chamber. If made out of metal it should be as short as possible to minimize the alloy solidifying in the tube. Another option is to make a funnel out of a few layers of aluminum foil (the easiest method). Better yet, make a pour tube or funnel out of heavy paper or thin cardboard. The fusible alloy should not be hot enough to burn the paper and will not conduct heat away from the alloy.
-
Clean and lightly oil the chamber, throat and at least a short section of the bore forward of the throat.
-
Fold up a cotton cleaning patch or section of paper towel and roll or form it into a cylinder shape until it will tightly fit into the bore and act as a plug/dam for the melted alloy. I prefer to insert the patch from the muzzle, but it can also be inserted from the breech or chamber end of the barrel. Using a cleaning rod, force the patch down the bore until it reaches a point approximately 3/4” to 1” in front of the mouth or throat of the chamber. Ideally, you’d like to see an inch or so of the rifling when the cast is made.
-
Secure the rifle vertically (chamber end up) in a padded vice or similar holder while taking precautions to protect the rifle from damage.
-
Heat the barrel around the chamber with a propane torch or hot air gun to a point that it’s good and warm but still comfortable to hold by hand. I’d say 125 degrees is about right. Do not overheat or get it so hot that it’s uncomfortable to hold by hand.
-
Melt the Cerrosafe.
There are many methods to melt CerroSafe. Use a double boiler or use other sources of indirect heat. Caution - applying direct heat and/or overheating may lead to separation of the components of the alloy or lead to the release of dangerous fumes. A large clean bullet casting ladle or plumbers ladle can be used to heat and pour the alloy, using a propane torch to heat the ladle from the bottom. I prefer to place the CerroSafe in a small “tuna fish” can and use a hot air gun for heating. The can is bent to form a convenient pouring spout and placed on a heat-resistant surface such as a brick.
“Vice-Grip”-type locking pliers can be used as a handle for the can. Since the melted CerroSafe should not be much more than 190 degrees F (less than the temperature of boiling water), I prefer to use heavy leather gloves when handling the tuna can. It provides for better control while pouring.
- Don’t forget to plug the extractor slot or a real mess will result when the alloy cascades down the slot into the action or receiver.
Tip: A common “Q-Tip” or cotton tip applicator works great if the slot is not too wide.
- Slowly pour the alloy, completely filling the chamber until the alloy covers the rim seat and forms a slight mound at the breech.
I’ve found that pouring too fast may result in very large voids in the cast. Over pouring will result in excess alloy spilling over the breech and likely prevent removal of the cast, especially if the action has not been disassembled. When using a pouring tube it may be necessary to have a helper heat the tube with a propane torch or hot air gun while pouring.
- Wait at least 10 minutes for the cast to solidify and shrink to push it out of the chamber.
The maximum shrinkage time is 20 to 30 minutes after which it will start to enlarge. Waiting any longer and the chances increase that the cast will not come out as it further enlarges.
-
Flip the rifle over (muzzle pointing up) and secure it in the vice.
-
While waiting to remove the cast, fold up a soft rag or towel and place it on the floor below the inverted rifle.
The towel will gently catch the cast as it’s pushed out of the chamber.
- Remove the cast using a cleaning rod inserted from the muzzle and tapped with the heel of your hand.
If the cast will not budge and something heavier would be required to drive the cast out than you’ve probably waited too long. In that case, reposition the rifle with the breech up and heat the barrel with a propane torch or hot air gun sufficiently to melt the alloy. Allow it to cool for ½ hr and try tapping it out again. If it will not budge on the 2nd attempt, you’ll have to heat the barrel sufficiently to melt the alloy and pour it out of the barrel.
- With the cast in hand, check out the surface condition.
Some small voids and frosting is normal, but many wrinkles or large surface voids are an indication that the alloy was not hot enough, the barrel was not sufficiently warm or the alloy was poured too fast into the chamber. Heavy frosting on the surface is an indication of overheating of the alloy or barrel. If either of these conditions prevents good measurements, make a new cast.
So now you’ve successfully made a CerroSafe cast. Having taking careful measurements after waiting the recommended 1.5 hrs, you’ve decided to keep the cast for future measurements. In that case, be sure to document the date and time the cast was made. I apply Scotch tape around the middle of the cast and write the info on it with a permanent ink felt tip pin. I’ve inadvertently mixed-up casts of the same caliber and find this to be a better method than labeling a storage envelope. Better yet, do both.
Adjusting Data Taken From “Aged” Casts
Most shooters make a chamber cast, take some measurements and never use the casts again for various reasons. The most obvious reason is, once accurate measurements are made and documented at the correct time, there’s little or no need to revisit the cast. Another reason is they are aware that the cast will expand over time but are unsure how to determine the original dimensions from the aged and expanded cast. For several reasons I’ve had the need to use old CerroSafe casts to verify original measurements and/or take dimensional data from different locations than originally measured. In doing so I came to the conclusion that the published expansion data are flawed as is the method to use it. The bottom line is the expansion data that has been published to date is very old (dating back to 1934) and I experimentally determined it to be incorrect.
Correctly Adjusting Data taken from “Aged” Casts
Based on the experimental data, the expansion factors listed in the table below are what I now use. The factors are in inches per inch. Therefore, to calculate original dimension (X) from aged dimension (Y) use the equation X = Y ÷ (1 + Factor). For a close approximation use X = Y (1 - Factor). For example, using 0.461” for the groove diameter of a 200 hour or older age 45 caliber cast will result in a value of 0.4587”. For this example, the equation is X = 0.461” ÷ (1 + 0.0051).
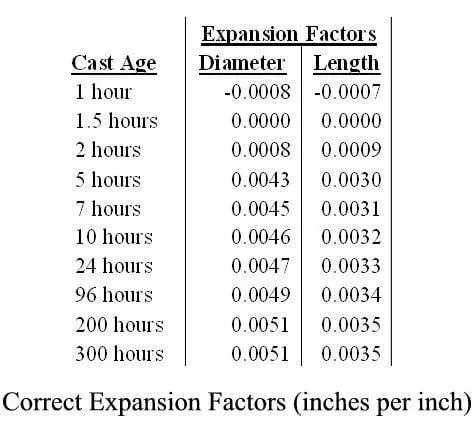
So, if you’ve been holding on to old CerroSafe chamber casts, pull them out, take some careful measurements and apply the formula and expansion factors listed above. The results should approximate the chamber, throat and bore dimension of your firearms.
Advantages & Disadvantages of CerroSafe Chamber Casts
So, what are the advantages and disadvantages to using CerroSafe? One advantage is the relative hardness of the cast. It’s not as easily damaged as an impact impression which is discussed below. If the cast is sufficiently long to include a short section of the lands, it will provide dimensional data of the throat and bore, but the same information is also available from a sulfur cast and impact impression. Also, a CerroSafe cast provides diameter data along the entire chamber, including the center and rear portion of the chamber; data not available from an impact impression. For most shooters this data is not particularly important so I don’t consider this much of an advantage, if any.
Disadvantages include: handling concerns and hazards; dealing with expansion characteristics; having to partially or fully disassemble the action to pour and remove the cast; the inability to directly measure maximum case length since the technique does not provide headspace dimensions. The latter two are the main reasons I prefer an impact impression. For a discussion on measuring headspace, refer to the chapters titled “Chamber Terminology” and “Browning’s Chambers”.
Impact Impressions
In lieu of using sulfur or CerroSafe for a chamber cast, making an impact impression is an excellent method, which is also commonly referred to as making an impact casting or impact slug.
Making an Impact Impression
-
Starting with a fire-formed case, shorten the length by approximately 0.200” (the amount is not critical) and fill it with lead to approximately ½” below the mouth.
-
You’ll need an additional amount of pure or nearly pure lead slightly smaller than the bore diameter. It will be dropped down the bore and compressed to form the impression. If bullet lead is not available, soft lead wire can be found in the fishing section of most sporting goods stores.
-
Clean, lightly oil the chamber and insert the partially lead-filled fire-formed case.
-
Next you’ll need a steel rod just under bore (land) diameter, available at most hardware stores. The rod should be a few inches longer than the barrel with a squared-off cleanly finished end. Wrap the rod just above the end with tape to make a snug fit with the bore, helping to center the end of the rod and eliminate any possibility of the edge galling against the bore. If a rod of the proper diameter is used, the possibility of damaging the rifling lands is just about nonexistent. Taping the end is just an extra precaution in case the edge of the squared off end is irregular. The only other location I’d consider taping is the section that comes in contact with the muzzle to protect the crown.
-
With the rifle standing up and butt stock on the floor, drop a sufficient quantity of lead down the muzzle to fill the case neck, chamber and throat when the impression is formed.
Be conservative and don’t use too much lead or the impression will be too long, extending down the bore and hard or impossible to remove without damaging it. If after removing the impression the amount of lead was not sufficient, it’s easy to redo with the addition of more lead.
-
Using a piece of paper towel, insert a wad of around 1/2” into the muzzle end. The paper will compress, fill the grooves and prevent the rod from embedding itself and seizing on the end of the compressed lead impression.
-
Insert the end of the rod into the muzzle until it contacts the paper wad. Now strike the rod with measured even stokes, just enough to fully compress the soft lead. When the lead is fully compressed a difference will be felt as the rod will start bouncing with every stroke of the hammer.
-
Open the action and gently push the case and lead impression out with the steel rod. Fold up a soft cotton rag or towel to catch the impression as it’s pushed out of the chamber. Be gentle so as not to further deform the lead impression. If the correct amount of lead was used, the impression should neatly form to the dimensions of the neck and mouth of the chamber, the throat and a small section of the bore. If it’s not long enough, repeat the process after adding more lead.
Note: When adding additional lead to an existing impression, I’ve had good success with roughing up the end of the lead impression, reinserting it, adding additional lead down the bore and swaging a new impression. In all but a couple of cases the new lead firmly adhered to the old impression and the seam was virtually invisible. The couple of times that the added lead did not stick well were most likely due to oil contamination. If, after roughing up the end of the old impression, there’s still a problem with the added lead adhering, start over by cutting off the lead extending out of the case and drill a little out of the mouth to a depth of .100” to .200”. Assuming the primer hole is plugged, an easier method may be to heat up the lead-filled case and pour a little out.
Advantages & Disadvantages of Impact Impressions
There are several advantages using this technique. It’s cheaper, simpler and easier than using CerroSafe. The rifle action does not require disassembly and there’s no chance of spilling excess material into portions of the action. Measuring the impact impression from the rear of the rim to the start of the chamber transition includes the actual headspace of the rifle and will directly provide the correct case over-all length (OAL) of a properly trimmed fire-formed case. Plus, if the impression is sufficiently long to include a short section of the lands, it will provide dimensional data of the throat and bore. Finally, there’s no concern about the impression changing dimensions over time.
There are a couple of disadvantages which I feel are not significant, but should be discussed. Being made from soft lead, one negative is the ease of damaging the impression if it’s not handled with reasonable care. Of course, if damaged it’s relatively simple to make another one. Another disadvantage is the inability to accurately measure diameters along the center portion and rear of the chamber; data that’s generally not required or useful for most shooters.
Wishing you great shooting,
Wayne